
Just start by auditing every sign and mapping priorities, then translate your new brand standards into scalable designs, verify local permits and zoning, choose durable materials and energy-efficient lighting, schedule phased production and installation with certified fabricators you trust, update digital displays and wayfinding, coordinate disposal or donation of old signs, and conduct a final on-site inspection to ensure consistency, visibility, and code compliance across all locations.
Key Takeaways:
- Perform a full signage audit and create a phased rollout plan aligned with budget and store priority
- Update and standardize design files: sizes, colors, fonts, materials, illumination and mounting specs
- Check local sign permits, zoning and safety codes; submit applications early to avoid installation delays
- Coordinate vendors, schedule installs during off‑peak hours, confirm mockups and site surveys before fabrication
- Inspect and document final installations, responsibly remove or recycle old signs, and publicize the refreshed look across storefront and digital channels
Assessing Current Signage
Start by cataloging every exterior and interior sign – awnings, window vinyls, channel letters, blade signs, and wayfinding plaques – and record size, material, illumination, condition, and exact location. For a 2,000 sq ft store you’ll typically log 8-12 sign assets; flag high-visibility elements first. Use photos, GPS coordinates, and a spreadsheet with columns for replacement cost estimates and rollout priority to streamline budgeting and contractor bids.
Identifying Outdated Elements
Scan for faded colors, peeling vinyl, mismatched typography, and legacy logos, which immediately undermine brand cohesion. If channel letters show cracked acrylic or backlights below 70% brightness, mark them for urgent replacement. Also check for corroded metals, delamination on composites, and municipal permit expirations – these often dictate phased updates and cost brackets.
Understanding New Branding Guidelines
Align each sign with your brand book by listing Pantone/CMYK values, approved typefaces and minimum sizes, mandated clear space, and allowed finishes. Specify illumination standards – for example, LED color temperature between 3000-4000K and minimum lumen output – so retrofit bids are comparable, and include digital specs for animated or matrix displays to avoid scope creep.
Detail tolerances and verification steps: set a Delta E tolerance ≤3 for color matches, define legibility rules (type sizes and contrast for viewing distances of 10-30 feet), approve specific material samples (powder-coated aluminum, satin acrylic), and require contractor photo proofs plus on-site measurement sign-off. Add typical budget ranges per sign type to accelerate procurement decisions.
Designing New Storefront Signs
When redesigning storefront signage, you should specify materials, scale and illumination tied to site constraints and budget-expect small fascia signs to run $1,500-$3,500, channel letters $4,000-$12,000, and illuminated backlit panels to add 20-30% to fabrication costs. Coordinate mounting points, wind-load ratings and local permit lead times (typically 4-6 weeks) so designs are buildable and code-compliant.
Collaborating with Graphic Designers
Work with your graphic designer to produce vector dielines (AI/EPS), full-size mockups and three concept directions, allowing two revision rounds; a typical workflow yields final artwork in 7-14 days after approvals. Have the designer liaise with your fabricator to confirm tolerances, illumination specs, and required file exports (cutlines, separations, Pantone calls) to avoid costly rework.
Incorporating Brand Colors and Logos
Translate brand colors into Pantone, CMYK and RGB values and lock logo proportions and clearspace for every sign type; specify minimum logo sizes (avoid details smaller than ½ inch) and ensure contrast meets a 4.5:1 ratio for legibility on digitized maps and wayfinding. Provide color chips and digital profiles to your vendor.
Test colors and finishes on-site using 6-12 inch sample panels in matte, gloss and textured options, viewed at intended distances and lighting (daylight, dusk, LED). Apply the legibility rule of thumb-1 inch of letter height per 10 feet of readable distance-when sizing type for road-facing signs, and capture photos or spectrophotometer readings to confirm the vendor match before full production.
Legal Considerations
Address legal checks early so your rollout timeline and budget reflect permit fees, zoning reviews, and trademark updates; sign permits commonly cost $50-$500 and take 2-6 weeks to process, while electrical or structural approvals may add time and $75-$300 in fees. You should also factor in potential fines of several hundred to thousands of dollars for noncompliant signage and the need to update business licenses or trademark registrations where your new mark appears on storefronts.
Permits and Regulations
When applying for permits, you’ll typically submit scaled drawings, materials, mounting details, and electrical plans to the city building department; illuminated signs require an electrical permit and often a separate inspection. Expect variable timelines-small towns can approve in a week, large cities 3-8 weeks-and plan for contractor coordination: installers often handle permit pulls but you remain responsible for code compliance and any alteration permits if the façade changes.
Zoning Laws and Compliance
Zoning ordinances control sign area, height, placement, and illumination-many municipalities cap storefront signs between 32-50 sq ft and restrict flashing or animated elements after 10-11 PM. You’ll face additional constraints in historic districts or mixed-use zones where design review boards may require proof of material, color palettes, and sightline studies before approval, and nonconforming signs often require a variance to change.
To navigate zoning, consult your municipal planning department and pull the specific sign code (often Chapter “Signage” or “Land Use”); if you need a variance expect a public hearing and 1-3 months for approval plus filing fees typically $200-$2,000. Provide a professional sign permit package-scaled elevations, photomontages of the proposed sign on the façade, and an electrical schematic-to speed review, and consider hiring a local code consultant or signage firm familiar with common conditions in your jurisdiction.
Choosing the Right Materials
Balance lifespan, budget, and local conditions when selecting materials: aluminum composite (Dibond) works well for flat panels and lasts 15-20 years, acrylic delivers sharp, illuminated faces with a 7-10 year expectancy, and HDU or PVC offers low-cost routed options for short runs. You should factor in fabrication time and installation weight-metal channel letters need heavier anchors-so prototype one store to test finish and mounting before a full rollout.
Durability and Weather Resistance
Pick materials and finishes matched to exposure: powder-coated aluminum resists corrosion for 10-15 years, marine-grade 316 stainless is recommended for coastal salt spray, and polycarbonate or UV-stable acrylic resists yellowing; specify IP65-rated LED modules and expect ~50,000 hours of life (roughly 6-10 years under typical retail hours). You should also require warranty terms for finish and electrical components in supplier contracts.
Aesthetic Appeal and Functionality
Choose finishes that reflect your positioning: brushed stainless or bronze conveys luxury, while glossy acrylic and edge-lit letters read modern and crisp; vinyl graphics are cost-effective for windows but fade faster. You should match illumination type to brand intent-halo-lit channel letters for sophistication, front-lit acrylic for high visibility-and confirm how each material prints, paints, or machines to preserve logo fidelity.
For legibility plan by distance: use the 1 inch = 10 feet rule for letter height (e.g., 10″ letters for ~100 feet viewing), aim for high contrast between copy and background, and pick LED color temperature to set tone (3,000K warm for inviting storefronts, 4,000K neutral/bright for tech or medical). You should also assess maintenance access-replaceable LED strips and removable faces reduce long-term service costs while preserving the aesthetic you selected.
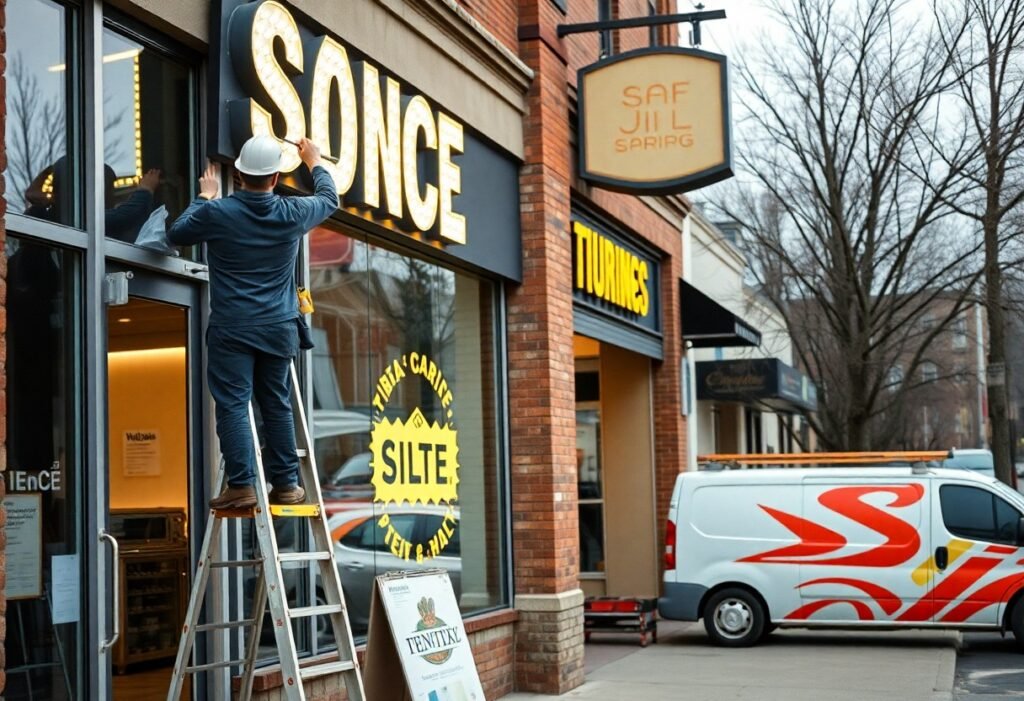
Installation Process
Phase the physical rollout: you should stage materials, verify power and mounting points, and secure necessary permits before crews arrive. For design-to-install examples, consult Recently Rebranded? It’s Time to Update Your Signage. Typical swaps run 2-8 hours per sign-channel letters average 4-6 hours-while awnings or totems may need scaffolding and multiple days. Factor in disposal of old signage, site protection, and a final illumination and mounting inspection to confirm compliance and uniform appearance.
Hiring Professional Installers
Select installers who carry $1M+ general liability and workers’ comp, hold local sign and electrical licenses, and provide OSHA-trained crews. You should request 2-3 recent references with photos of similar channel‑letter, LED retrofit, or awning projects. Expect a certified electrician for LED hookups and insist on UL-listed components. Compare bids (flat per-sign vs. hourly $75-$150/hr), turnaround times, and warranty terms (commonly 12-36 months) before awarding the contract.
Timeline and Project Management
Map a phased schedule: allow 2-6 weeks for fabrication, 48-72 hours for routine permits, and 1-3 days onsite per location including testing. You should batch nearby stores to reduce crane and mobilization fees, target evening installs to limit impact, and assign a single project manager for vendor coordination. Build contingency buffers of 10-20% for weather, supply delays, and inspection rework.
Dive deeper into sequencing: use a Gantt with milestones-audit, order long‑lead parts, prefabrication, install, inspection-and track vendor lead times (LED modules 1-2 weeks, custom channel letters 2-4 weeks, specialty totems 4-8 weeks). For scale, a regional retailer replaced 60 signs in 8 weeks by running three rotating crews and batching fabrication; that reduced average downtime to ~1.5 days per store. You should hold weekly status calls, maintain photo checklists, and allocate a 10-15% contingency budget to keep the rollout on schedule.
Promoting the New Brand Image
Tie your signage rollout to measurable marketing activity so each new storefront becomes a conversion point: coordinate store refreshes with a local ad push, signage reveals, and a limited-time offer. For example, roll out 10 pilot stores in one month, track a 30-day lift in foot traffic and use POS codes to attribute sales. This syncs creative, PR, and ops so design updates drive short-term revenue while reinforcing long-term brand recognition.
Leveraging Social Media
Use short-form video and geotargeted ads to amplify each sign reveal: post 15-30 second Reels or TikToks showing the before/after, schedule three launch posts across IG and FB, and boost one post within a 5-10 mile radius; partner with 2-3 local micro-influencers to extend reach. Encourage user-generated content with a branded hashtag and a simple incentive like a free coffee or 10% off to increase shares and trackable conversions.
Organizing a Launch Event
Plan a timed, local launch that ties the new signage to an experience: invite 50-200 customers, offer a ribbon-cutting photo op for local press, and run a 48-72 hour grand-opening discount (e.g., 20% off). Coordinate staff briefings, branded merch, and clear wayfinding so attendees see the full brand system in action and you capture immediate sales and social content.
Delve into logistics: secure permits 2-4 weeks ahead, allocate a $2,000-10,000 budget depending on scope, and create a 5-point event checklist covering AV, press kit, influencer arrival times, safety, and a lead-capture plan (raffle or QR signup). After the event, analyze footfall, redemption codes, and social engagement to decide which elements to scale for the next store refresh.
To wrap up
Considering all points, you should audit every sign location, update designs to match new brand standards, obtain permits, and schedule professional fabrication and install to ensure consistency and compliance; coordinate with vendors, train staff on new visual guidelines, plan a phased rollout to minimize downtime, and monitor feedback to make quick adjustments so your storefront communicates the rebrand effectively.
FAQ
Q: What initial steps should I take before ordering new storefront signs after a rebrand?
A: Conduct a signage audit listing every exterior and interior sign, measure mounting locations, photograph existing conditions, and check electrical and structural constraints. Develop a signage guideline aligned with the new brand (logo sizes, color codes, typefaces, materials). Establish a budget and timeline, obtain stakeholder approvals, and prepare detailed drawings or mockups to request accurate quotes from vendors.
Q: How do I handle permits, zoning, and code compliance for new signs?
A: Research local sign ordinances and building codes for each property, including size limits, illumination rules, and historic-district restrictions. Prepare permit-ready plans showing dimensions, materials, attachment methods, and electrical wiring for illuminated signs. Submit applications early, budget for permit fees and review times, and work with a contractor or sign company experienced with local authorities to secure inspections and approvals.
Q: What factors should guide my choice of materials and fabrication methods?
A: Select materials based on brand appearance, durability, climate resistance, and maintenance needs-options include acrylic, aluminum, stainless steel, routed or formed channel letters, and vinyl overlays. Choose illumination types (backlit, halo, LED modules) for energy efficiency and visibility. Request sample panels, evaluate finish tolerances and color matching, verify warranties, and confirm the fabricator’s capacity for consistent quality across all locations.
Q: How can I plan installation to minimize business disruption and ensure safety?
A: Schedule installations during off-hours or low-traffic periods and perform a site-specific safety plan including fall protection, traffic control, and utility checks. Stage materials off-site or in designated on-site zones to reduce clutter. Use modular or quick-mount systems where possible to shorten on-site labor. Coordinate electrical shutdowns, inspections, and testing in advance, and provide temporary signage or directions for customers while work is underway.
Q: What should I do with old signs and how do I ensure a consistent rollout across locations?
A: Assess old signage for reusable components (electrical guts, frames) and recycle materials that can’t be repurposed. Create a phased rollout schedule prioritizing high-visibility locations, then document each installation with photos and QA checklists. Update internal asset inventories and third-party listings (Google, directories), train staff on the new visual identity and messaging, and gather post-install feedback to correct any inconsistencies quickly.