
Just because your LED sign flickers doesn’t mean it’s irreparable; you can methodically troubleshoot by inspecting power supplies and wiring, tightening connections, checking voltage and grounding, testing or replacing control modules and dimmers, updating controller firmware, and consulting manufacturer documentation or a qualified technician for persistent or complex issues.
Key Takeaways:
- Check the power source and wiring: verify supply voltage under load, proper rating, tight connections, breakers/fuses, and absence of voltage drop on long runs.
- Inspect the LED driver/controller: ensure correct type (constant current vs constant voltage), adequate wattage headroom, compatible dimmer/PWM frequency, and swap with a known-good driver to isolate faults.
- Examine connections and grounding: tighten or reflow solder joints, replace corroded connectors, confirm correct polarity and a solid ground to prevent intermittent contact and noise.
- Test LED modules and layout: look for damaged LEDs, water ingress, thermal issues, or oversized runs that cause uneven current; isolate sections to locate a bad module.
- Use diagnostic tools and fixes: measure with a multimeter and oscilloscope to identify flicker frequency, add filtering or capacitors, replace failing drivers/LEDs, and upgrade to higher-quality components if needed.
Understanding LED Sign Flickering
When your sign flickers, it’s usually because light output is modulating rather than steady; flicker commonly occurs with frequency below ~200 Hz or with high modulation depth (>10%), which your eye can perceive as strobe or pulsing. You should suspect supply voltage swings, driver PWM settings, control-system frame rates, or thermal-related driver degradation; diagnose with an oscilloscope or flicker meter to capture waveform, frequency, and modulation percentage for targeted fixes.
Common Causes of Flickering
You’ll most often find flicker caused by unstable mains or undersized supplies (voltage droops >10% under load), failing drivers (ageing electrolytic capacitors, thermal shutdown), low-frequency PWM dimming (<200 Hz), poor wiring or loose connectors, incompatible video controllers, and moisture-corroded solder joints-each manifests differently on an oscilloscope and requires distinct remedies like driver replacement, higher-rated PSU, or rewiring.
Effects of Flickering on Visibility
Flicker reduces perceived brightness and contrast, shortens comfortable reading distance, and increases reaction time for passing drivers: visible strobing below ~60 Hz is distracting, 60-200 Hz causes discomfort and reduced legibility, while frequencies above ~200-1,000 Hz become progressively less noticeable; you’ll see brand impact and safety issues if signage isn’t stabilized.
Quantitatively, measure modulation depth (%) and flicker index to assess impact: modulation depths over 10% at <200 Hz typically produce visible flicker, and a flicker index >0.1 often correlates with complaints or reduced dwell time. You can replicate issues by varying supply voltage ±10% or switching PWM frequency; targeted fixes (higher-frequency drivers, decoupling capacitors, voltage regulation) usually lower modulation into an imperceptible range and restore legibility.
Initial Troubleshooting Steps
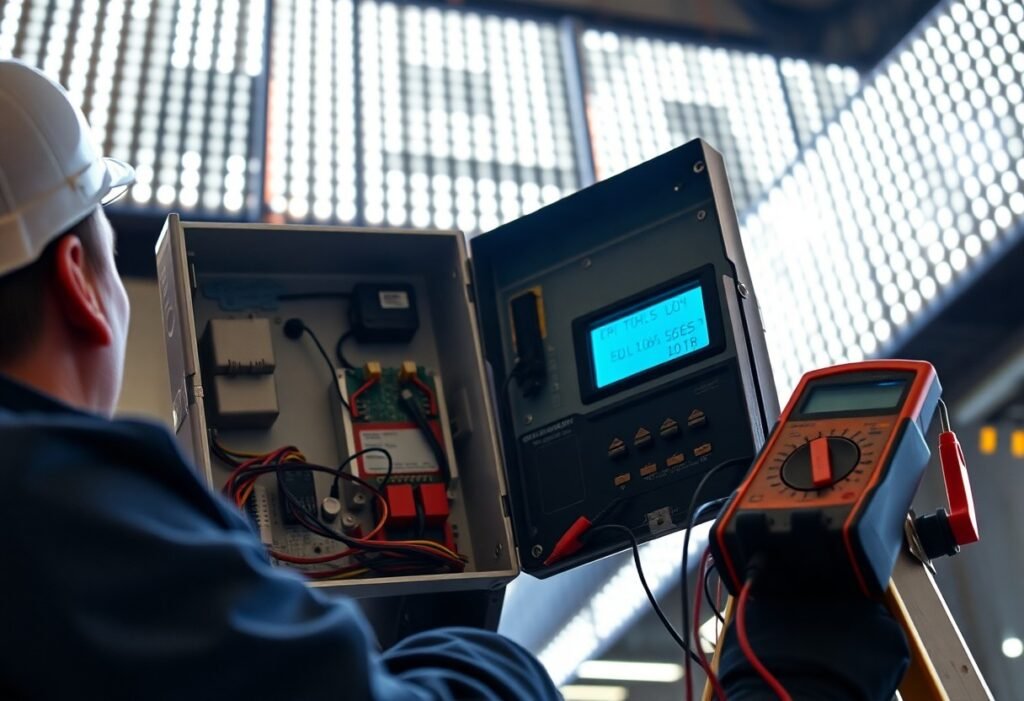
Begin by isolating power, wiring, and modules to narrow the fault. You should measure supply voltage under load-12 V and 24 V systems typically allow ±5%-and compare at the PSU and the furthest LED; a drop over 0.5 V or visible thermal hotspots point to supply or cabling issues. Use a multimeter, clamp meter, and a thermal gun to collect objective readings before swapping components.
Checking Power Supply
Power supplies fail gradually: you should test DC output under typical load and look for excessive ripple (>200 mVpp) or voltage sag beyond 5% of nominal (e.g., >0.6 V on 12 V). Verify amperage rating with 20% headroom-if your sign draws 3 A, use a 3.6 A+ supply-and replace units older than ~5 years or with bulging caps or overheating under load.
Inspecting Connections
Inspect all connectors, terminal blocks, and solder joints for looseness, corrosion, or discoloration; you should wiggle plugs while observing flicker and check for hairline fractures with a magnifier. Confirm wire gauge (minimum 18 AWG for runs ≤5 m, 16 AWG for longer) and perform a simple pull test on crimps-roughly 10-15 N-to ensure mechanical integrity before re-tightening terminals to spec.
For deeper diagnostics, measure contact resistance-values above ~0.05 Ω on a connector can produce measurable voltage drop on 24 V systems and induce flicker. You should look for moisture ingress and compromised seals on outdoor signs; a documented case showed a corroded JST connector adding 0.2 Ω and causing visible pulsing on a 5 m run. Replace damaged crimps, apply dielectric grease, and re-seal with heat-shrink or IP-rated fittings.
Advanced Troubleshooting Techniques
Move into layered diagnostics: isolate control, power, and firmware so you can pinpoint intermittent sources. Measure PWM frequency (aim for >1 kHz), check supply ripple (target <200 mV p‑p on 12 V rails), and verify data refresh-DMX512 typically runs ~44 frames/sec, so slower update rates can show visible strobing. Use an oscilloscope and a known‑good controller to compare behavior under identical loads.
- Bench‑test one module with a stable 12/24 V supply and known pattern.
- Probe the control signal with an oscilloscope for PWM duty, frequency, and noise.
- Swap controllers, cables (RJ45/USB), and power supplies to isolate the failing component.
- Update firmware and re‑run the failing sequence to rule out software timing bugs.
Advanced Diagnostics
| Symptom | Diagnostic action |
|---|---|
| Intermittent whole‑sign flicker | Probe supply under load for voltage dips >0.3-0.5 V; check breakers and connectors; test with a 10% heavier load to reveal marginal PSUs. |
| Strip or module flickers independently | Swap the module to another channel, measure LED forward voltage (2.0-3.6 V per die), and inspect solder joints and trace continuity. |
| Pattern‑dependent strobing | Capture control bus timing with a logic analyzer; verify PWM frequency and packet timing (DMX/Art‑Net packet gaps can cause frame skips). |
| Nighttime dimming causes flash | Check photocell/clock schedules and dim curves; verify driver supports PWM dimming below 5% without introducing flicker. |
Testing Control Systems
You should verify signal integrity end‑to‑end: use an oscilloscope to confirm PWM frequency and duty cycle, inspect serial/data lines for CRC errors, and check grounds for loops. Test a controller with a known‑good cable and a single short LED string; if flicker disappears, expand segments until it recurs. Replace relays and opto‑isolators if you see intermittent high‑voltage spikes or ground shifts.
Analyzing Software Settings
Check refresh rates, frame timing, and dithering options in your controller software-low update rates or aggressive dithering can create visible flicker. Confirm firmware version; older builds sometimes drop frames under high channel counts. Turn off effects one at a time and test at fixed brightness to isolate software‑induced artifacts.
Dig deeper into mapping and bandwidth: if you drive 3,000 pixels over DMX, you’ll exceed a single 512‑channel universe-split into multiple universes or use Art‑Net/sACN to avoid frame drops. Also verify pixel grouping, interpolation rates, and buffer sizes; mismatches between the controller’s frame buffer and your pixel hardware commonly produce timing jitter that looks like flicker.
Maintenance Tips to Prevent Flickering
You should schedule routine maintenance to catch loose connections, corroded contacts, and aging drivers before they cause intermittent flicker; industry practice is inspections every 3 months for outdoor signs and every 6 months for indoor displays. Many LED drivers are rated for 50,000-100,000 hours, so tracking run hours helps predict failures. Tighten terminals to manufacturer torque specs, replace drivers with >10% voltage drift, and log repeat patterns for vendor escalation. After each inspection, log results and schedule repairs within 48 hours.
- Clean lenses and ventilation every 1-3 months to prevent heat buildup
- Check input voltage at mains and driver-fluctuations beyond ±5% often cause flicker
- Verify grounding and surge protection; replace surge devices every 3-5 years
- Keep spare drivers/modules to swap and isolate faults quickly
Regular Inspections
You should perform visual and electrical checks: inspect solder joints, connector torque, and wiring insulation. Use a hand-held multimeter and an oscilloscope to detect voltage ripple above 1 Vp-p or PWM irregularities; a cheap DMM won’t reveal transient spikes. For outdoor signs, inspect seals and drainage every quarter; indoor displays can be biannual. Log ambient temperature and run-hours to correlate with failures, and replace components showing more than 10% brightness loss.
Updating Firmware and Software
You should keep controller and driver firmware current since many vendors release fixes for PWM timing and communication timeouts-updates typically appear every 6-12 months. Check vendor release notes for fixes related to flicker and verify compatibility lists for your hardware before updating. Apply firmware during off-peak hours and run a 30-minute burn-in test on a single unit to confirm stability before rolling out site-wide.
Before updating, back up current settings and note firmware version (e.g., v2.4.1). Stage updates on a test panel: flash a spare controller and run it 24-48 hours while monitoring with an oscilloscope for PWM anomalies and a lux meter for <1% flicker. Keep a rollback plan and changelog; if a vendor patch introduces instability you should be able to revert within 2 hours. Also confirm baud rates and protocols between drivers and control software to avoid handshake timeouts that present as flicker.
Professional Help: When to Call an Expert
If basic fixes fail or flicker returns after swapping drivers, call a qualified technician-persistent flicker across modules, intermittent power loss, or signs of overheating usually need professional tools. You can read more at How to Resolve Flickering in LED Lights? A pro will perform load tests, oscilloscope scans, and thermal imaging to locate intermittent faults and prevent repeat failures.
Indicators for Professional Assistance
You should contact an expert if you detect burning smells, visible arcing, smoke, repeated driver failures, breakers tripping, flicker across the entire sign, or supply voltage swings beyond ±10% under load; also seek help when troubleshooting requires invasive access, complex controllers, or when driver replacement doesn’t fix the issue-these point to system-level faults or safety hazards.
Choosing the Right Technician
You want a licensed electrician or sign technician with 3+ years of LED signage experience, manufacturer certification (e.g., Mean Well, Philips), proof of insurance and bonding, knowledge of UL/NEC requirements, and clear warranty terms; insist on a written scope and itemized estimate before work begins.
Ask candidates to demonstrate diagnostic steps: oscilloscope traces of PWM frequency (hundreds to thousands Hz), thermal imaging of hotspots, in-circuit voltage under load, and a plan for replacing drivers/modules versus rewiring; expect diagnostic fees typically in the $80-200 range and a written report with photos and test readings.
Conclusion
Considering all points, you should methodically check the power source, wiring, connectors, and your LED driver for loose connections or voltage fluctuations; verify controller and dimmer compatibility; inspect for moisture or heat damage; test with a known-good power supply or swap suspect modules; and replace faulty components in your sign. If flicker persists after these steps, hire a qualified technician to diagnose driver or circuit issues.
FAQ
Q: What are the most common causes of LED sign flickering?
A: Flickering usually stems from power issues (unstable mains, undersized or failing power supply, voltage drop across long runs), faulty or overheating LED drivers, loose or corroded connections, incompatible dimming/PWM controllers or incorrect PWM frequency, damaged LED modules, poor grounding or wiring gauge, and environmental factors like moisture or extreme temperatures causing intermittent contacts.
Q: How do I quickly determine whether the problem is the power supply, driver, controller, or the LED modules?
A: Observe the flicker pattern (whole sign vs sections); isolate sections by disconnecting modules to see if flicker follows a segment or stays with the driver/controller. Substitute a known-good power supply and/or driver to test. Disconnect dimmer/controller to run LEDs directly from a stable DC source. Measure voltage under load; if voltage falls or has large ripple the supply is suspect. If only certain LEDs flicker, the modules or connections are likely at fault.
Q: What tools and measurements should I use when troubleshooting flicker?
A: Use a multimeter to check DC voltage under load and continuity of wiring. Use an oscilloscope to inspect PWM signals and ripple on the supply (voltage spikes, low-frequency modulation). Thermal camera or IR thermometer finds overheating components. A bench power supply, spare driver, or test LED strip helps isolate faulty parts. Carry basic tools for tightening, cleaning, and reseating connectors.
Q: How do I fix power supply and wiring problems that cause flicker?
A: Calculate voltage drop and use the correct wire gauge and route to minimize loss; shorten runs or supply power at multiple points. Replace undersized or failing supplies with properly rated, regulated PSUs and choose constant-current drivers when required. Secure all terminals, clean corroded connectors, add proper grounding and surge protection, and ensure ventilation or heat-sinking to prevent driver overheating.
Q: When should components be replaced or a professional be called in?
A: Replace the driver or power supply if voltages are out of spec, ripple is high, or the unit overheats. Replace LED modules if individual LEDs show visible damage or inconsistent output after isolating. Call a qualified electrician or sign technician for high-voltage systems, persistent intermittent faults you cannot isolate, repeated failures after component swaps, or any water-damaged or safety-risk situations.