
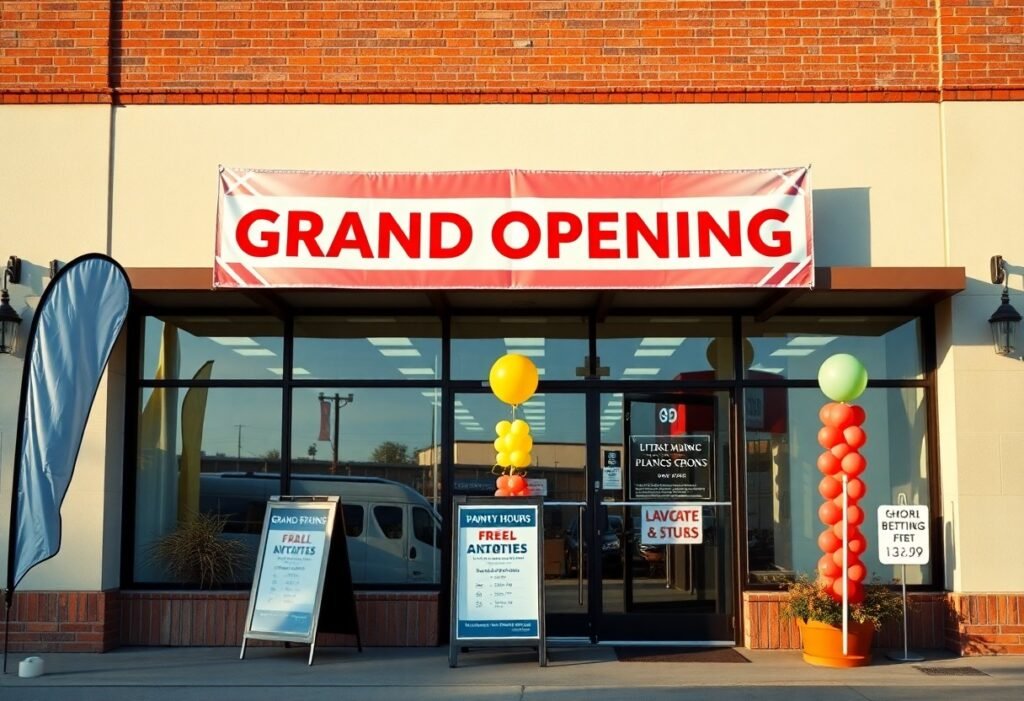
Signage choices for your grand opening range from vinyl banners and backdrops to A-frame sandwich boards, window decals, feather flags, coroplast yard signs, magnetic vehicle signs, temporary LED displays or inflatables; you should choose materials, placement, and legible design that suit your budget, permit rules, visibility and brand identity to attract foot traffic and communicate offers clearly.
Key Takeaways:
- Vinyl banners – large, affordable, weather-resistant and quick to install for high-visibility messaging.
- Feather or teardrop flags – portable, eye-catching on sidewalks; use weighted bases or stakes for stability.
- A-frame sidewalk signs – durable, repositionable, and ideal for directional messaging or daily specials.
- Window clings and decals – high-impact close-range advertising that’s easy to apply and remove without damage.
- Inflatable arches and balloon displays – create a festive entrance and strong curb appeal; require power or anchoring.
Importance of Effective Signage for Grand Openings
Effective signage converts curiosity into visits: a FedEx Office study found 76% of consumers have entered a store because of its signs, so your display can be the deciding factor. Use a 10×3 ft vinyl banner for curb impact, combine it with a 24×36 in A-frame on the sidewalk, and ensure lettering follows the 1 inch per 10 feet legibility rule so passersby can read your message from 30-50 feet.
First Impressions Matter
Your storefront graphic should communicate brand, offer, and entry point in one glance: stick to 3-7 words, high-contrast colors, and a single sans-serif font. Apply the 1 inch per 10 feet guideline for letter height, keep logo sizes balanced (logo no more than 30% of headline area), and choose durable materials-3-4 mil vinyl for short runs, 13 oz for windy exteriors-to avoid sagging or fading on opening day.
Attracting Attention
Placement and motion drive noticeability: mount banners at eye-level for foot traffic and on the façade or roofline for distance visibility, add illuminated backdrops for evening openings, and use bright accent colors (e.g., red or yellow) to boost peripheral detection. Include a clear call-to-action like “Free samples – first 50” to create urgency and measure impact during the event.
To maximize reach, deploy a layered approach: exterior banner (3×10 ft) for curb appeal, A-frame (24×36 in) for sidewalk direction, and window clings for interior continuity. Add a scannable QR code at least 1.5 in square for instant sign-ups, position directional arrows 10-20 ft before the entrance, and verify local sign permits-small planning steps that can increase foot traffic on opening day.
Types of Temporary Signage
Survey options by sightline and duration: vinyl banners for long-range visibility, feather flags for curb attraction, A-frames for sidewalk capture, window clings for storefront graphics, and step-and-repeat backdrops for photo moments; see 17 outdoor signage ideas for your small business for visuals and templates. Thou must match choice to footfall, sightlines and permit limits so you drive visits.
- Vinyl banners – high visibility, cost-effective
- Feather flags – mobile curb appeal
- A-Frame signs – sidewalk impulse capture
- Window clings – no-drill storefront promos
- Backdrops – brandable photo opportunities
| Vinyl Banners | Long-range messaging; façades & fences |
| Feather/Teardrop Flags | Drive-by attention; parking lots |
| A-Frame Signs | Sidewalks, directional promos |
| Window Clings | Door/window promotions without hardware |
| Step-and-Repeat Backdrops | Photo ops, social media engagement |
Banners
You should pick vinyl banners when you need large-format messaging: common sizes are 3’x6′, 4’x8′ and 6’x10′, printed on 13-18 oz PVC with grommets and hemmed edges; expect $20-$150 depending on finish, and choose matte or gloss to reduce glare for daytime viewing.
A-Frame Signs
You can deploy A-frames to capture sidewalk traffic quickly; standard panels are 24″x36″ or 18″x24″, materials range from molded plastic to aluminum, and entry-level boards start near $50 while branded, weighted units run $200-$300.
For durability select a weighted or water-fill base, use interchangeable printed panels to rotate promos, and place the board 3-6 feet from the storefront to keep clear sightlines; design for 3-5 second legibility with 72-150 pt headline type to maximize impulse reads.
Window Clings
You may favor window clings when you want no-drill graphics: choose clear, opaque, static or perforated vinyl (one-way view) for sizes from small decals to full-window coverage; typical costs are $10-$60 and installation usually takes under 30 minutes for a single pane.
Perforated vinyl preserves outward visibility while showing a full graphic to pedestrians, static clings let you swap weekly promos without adhesive residue, and using 150-300 dpi artwork keeps images crisp from 10-30 feet; always clean the glass with isopropyl alcohol before applying to avoid trapping dust.
Placement Strategies
Place signage to intercept attention where people naturally slow or decide: near crosswalks, at building entrances, and along approach routes. You should prioritize sightlines-mount banners at 4-6 feet for pedestrian eye level and position flags or feather banners within 10-15 feet of the curb for drivers. For set-back storefronts, install wayfinding signs at the sidewalk edge or use sidewalk A-frames to bring messaging within the first 5-10 seconds of a passerby’s view.
High-Visibility Locations
Target corners, transit stops, and window frontage for maximum exposure: corner storefronts offer two-direction visibility and bus stops provide recurring impressions from commuters. You should place a banner above the entrance and a feather flag near the curb; windows can host 24″x36″ posters that read from 20-30 feet. For parking-lot businesses, place signs at the lot entrance and pedestrian pathways to capture drivers as they park.
Directional Signage
Use directional signage to convert street interest into foot traffic by guiding people from main thoroughfares and parking areas to your door. You should deploy A-frames with arrows at every intersection within 300-500 feet, place small stake signs along sidewalks, and add larger wayfinding boards at garage exits. Consistent color and arrow motifs improve recall and reduce confusion for first-time visitors.
For best results, size text to viewing distance-follow the 1 inch of letter height per 10 feet rule (e.g., 4″ letters ≈ readable at 40 feet)-and use high-contrast colors plus simple arrows. You should prefer weather-resistant materials (PVC, coroplast, vinyl) for outdoor placements, include distance cues like “100 ft” when applicable, and verify local sign ordinances for sidewalk and curb placements to avoid fines.
Design Tips for Maximum Impact
Prioritize visual hierarchy so your headline dominates, supporting text supplements, and graphics guide the eye; keep headlines at least twice the size of subtext and use the 1 inch per 10 feet rule for letter height (30 ft = ~3″ letters). Balance negative space and contrast to speed comprehension, and test legibility from typical pedestrian and drive-by distances. Thou, you should verify readability in real-world lighting before finalizing print.
- Limit headline to 3-7 words for instant understanding.
- Use 1″ per 10 ft viewing-distance guideline for letter height.
- Place CTAs in the lower third where eyes rest after reading the headline.
- Keep logos and decorative elements under 25% of total sign area.
Color and Font Choices
You should use high-contrast pairs (dark on light or light on dark); aim for a minimum perceived contrast so text reads easily from distance-black on yellow or white on navy works well. Pick a clean sans-serif for headlines (Helvetica, Arial, Proxima) and reserve decorative or script fonts for logos only, limiting yourself to two typefaces and consistent weight to maintain hierarchy and quick readability.
Message Clarity
Keep your message concise: 3-7 words for the main offer, use numerals for discounts (e.g., “50% OFF”), and include a single clear CTA like “Enter for 20% Off” or “Free Samples Today.” Prioritize verbs and numbers, avoid punctuation clutter, and ensure the primary message occupies visual prominence so passersby grasp the offer in under two seconds.
To refine clarity further, test signs at actual viewing distances-stand 30-50 feet away and note what you read first; photograph the sign on a smartphone and zoom out to simulate drive-by speed; swap a word or number (A/B test) on temporary banners to measure which phrasing draws more engagement; and always put the most actionable info (discount, time-limited phrase, and CTA) on the top two visual tiers so your message converts curiosity into entry.
Compliance and Permissions
You must verify municipal sign codes, HOA covenants and right-of-way rules before finalizing graphics and placement; enforcement commonly results in fines ($50-$500), immediate removal, or event delays. Many jurisdictions limit display duration, size and illumination, so choose banners and A-frames that meet those constraints and are easy to uninstall for inspections. Planning permits and written property-owner consent often speed approvals for grand opening dates.
Local Regulations
Check your city’s zoning and sign code for size limits (commonly 6-32 sq ft), maximum heights, setback requirements and prohibited materials; downtown or historic districts often add design overlays and public‑right‑of‑way bans. Also confirm HOA rules and lease clauses-some retail centers cap temporary signs to one banner or two sandwich boards-and note time limits that frequently range from 14 to 90 days.
Permitting Processes
Start by contacting the municipal planning or building office to learn permit types and fees; typical temporary-sign permits require a site sketch, proof of property owner consent, and a $25-$200 fee with processing times of 3-14 business days. After submission, you might receive a stamped permit or decal that must be displayed; expedited options are sometimes available for same‑day events.
Gather photos of the storefront, scaled drawings of the sign and its fastening method, proof of insurance when required, and written landlord authorization to avoid rejection; structural calculations are often necessary for freestanding or signs over 32 sq ft. If your installation encroaches on sidewalks or streets, plan to coordinate with the DOT or public works; inspections may follow installation and noncompliance can trigger stop‑work orders and removal at your expense.
Conclusion
The best temporary storefront sign options for your grand opening combine visibility and professionalism: large vinyl banners, printed window clings and decals, sandwich/A-frame boards, feather flags, retractable roll-up displays, and short-term illuminated or LED rental signs. You should choose materials and sizes that suit pedestrian versus street traffic, ensure high-contrast graphics and clear calls to action, and coordinate colors with your brand so you project a polished, attention-grabbing presence during the event.
FAQ
Q: What makes vinyl banners a good choice for a grand opening?
A: Vinyl banners are durable, cost-effective, and highly visible at larger sizes. They come in many sizes, can be hemmed with grommets for easy hanging, and tolerate outdoor conditions when laminated or made from tear-resistant material. Use wind slits or reinforced corners for windy locations, choose high-contrast colors and large type for readability from the street, and factor in local sign permits for building-mounted or sidewalk-facing placements.
Q: Are feather flags or teardrop flags effective for attracting foot and vehicle traffic?
A: Yes-feather and teardrop flags add vertical presence at curbside and are visible over parked cars and low landscaping. They’re lightweight, portable, and available with telescoping poles and weighted or stake bases for different surfaces. Select bright colors, bold logos, and short calls-to-action; account for wind ratings and secure anchoring, and check sidewalk placement rules to avoid blocking pedestrian flow.
Q: When should I use A-frame (sandwich board) signs for a grand opening?
A: Use A-frame signs for sidewalk-level messaging aimed at pedestrians, such as directional arrows, special offers, or event times. They’re double-sided, easy to update with changeable inserts or chalkboard faces, and stable in light wind when weighted. Ensure text is large and legible at a glance, position the sign to comply with local right-of-way rules, and choose weatherproof materials for rainy days.
Q: What are the benefits of window clings and perforated window graphics during a grand opening?
A: Window clings and 1-way perforated vinyl let you brand glass storefronts without permanent alteration. Full-color prints cover windows for high-impact imagery or promotional messaging; perforated vinyl preserves inside views while displaying a graphic outside. They’re simple to install and remove, minimize installation hardware, and are ideal when you want to block out renovations or create a reveal effect on opening day.
Q: Are temporary LED/digital signs or inflatables worth using for a grand opening?
A: Temporary LED or digital rental signs and inflatables are highly attention-grabbing-LEDs offer scrolling messages, animations, and brightness control for nighttime visibility; inflatables and sky dancers generate motion that draws eyes. Consider power availability, rental cost, noise or flashing restrictions, and permit requirements. Use short animated lines or bold statements for LEDs and keep inflatables anchored and sized to local ordinances.