
With proper understanding of sign wall penetration standards, you ensure seal integrity and structural safety when installing signs through exterior walls. These standards guide selection of flashing, sealants, sleeves, and fastener detailing to prevent water ingress, thermal bridging, and corrosion while meeting fire and load-bearing requirements. By following tested installation methods and verifying compliance with local building codes and manufacturer specifications, you protect your building envelope and occupant safety.
Key Takeaways:
- Maintain waterproofing continuity around penetrations using integrated flashings, back-pans or membrane wraps and secondary drainage paths to prevent water ingress and hidden moisture build-up.
- Specify compatible sealants, gaskets or compression fittings sized for anticipated movement, UV exposure and substrate chemistry to preserve long-term seal performance.
- Preserve fire- and smoke-resistance ratings where penetrations pass through rated assemblies by using tested/approved firestop systems (e.g., ASTM E814/UL 1479) and following code requirements.
- Design anchors and supports for wind, seismic and impact loads with corrosion protection and isolation details so fixation does not damage waterproofing or cladding systems.
- Require on-site inspection, periodic maintenance, tested penetrations, and documentation (manufacturer instructions, test reports, code approvals) to ensure ongoing waterproofing and safety compliance.
Understanding Sign Wall Penetration Standards
You must reconcile structural, electrical and waterproofing standards when planning penetrations: IBC/ASCE 7 dictates wind and seismic loads (common design wind speeds range 90-140 mph), UL 48 covers electric sign wiring, and fire-rated walls need through-penetration systems tested to UL 1479 (up to 4-hour ratings). Practical measures include backer plates, sealed gaskets, and flashed terminations; ASTM E1105 field-testing verifies water tightness after installation. Failure to align these standards creates leaks, corrosion and unsafe anchorage.
Definition of Sign Wall Penetration
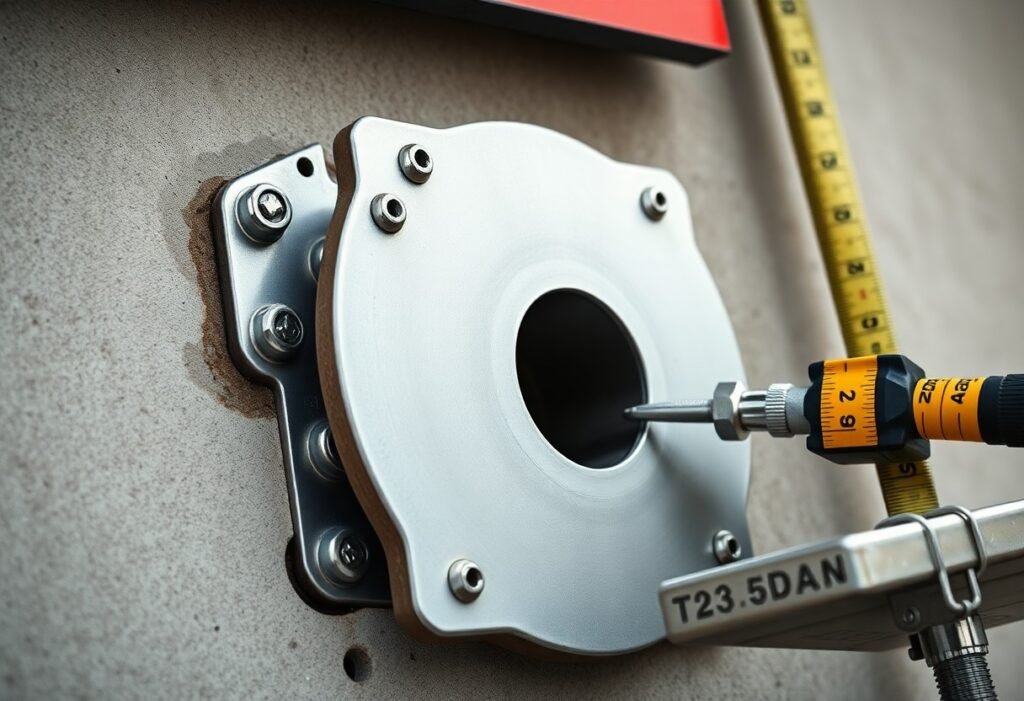
A sign wall penetration is any hole, bolt, conduit or sleeve that breaches the exterior or fire-resistance-rated wall plane to support a sign or deliver power. You evaluate penetration diameter, spacing (typical anchor spacing 12-24 in), fastener type, backing plate thickness (often 1/8-1/4 in steel) and whether the assembly crosses a rated fire barrier, which then requires tested firestop and sealing systems.
Importance of Compliance
You protect occupants, building envelope performance and liability by complying: improper sealing leads to water intrusion, mold and accelerated corrosion of anchors; inadequate structural design risks detachment under wind gusts. Municipal inspections and insurer reviews reference IBC, NFPA and UL standards, so noncompliance can trigger remediation orders, denied claims and contractor rework. Field-tested details and documented materials reduce that exposure.
You can reduce leaks and legal exposure by following specific steps: require mockups and ASTM E1105 water tests, specify 316 stainless or coated anchors in coastal zones, use tested UL 1479 firestop systems where penetrations cross rated walls, and document torque specs and sealant types (silicone or polyurethane with 20-30 year service life). Schedule inspections every 3-5 years and retain installation records to demonstrate compliance during audits or insurance reviews.
Relationship Between Waterproofing and Sign Wall Penetration
When you place sign supports through an exterior wall you create a primary failure point for the envelope; field surveys commonly attribute 50-70% of wall leaks to penetrations and transitions. Integrating membrane wraps, back-pans and flashed anchor details to meet IBC and ASTM guidance (e.g., ASTM E2112) reduces risk-case studies show retrofit of membrane-wrapped anchors and sloped back-pans cut infiltration by as much as 80% on institutional façades.
Waterproofing Techniques
You should combine approaches: use sheet membranes (40-80 mil), liquid-applied seamless membranes, and mechanically fastened or self-adhered flashings at penetration interfaces. Tie the sign back-pan into through-wall flashing and secondary drainage or weeps, seal with closed-cell gaskets or 2-part polyurethane sealants, and consider a drainage plane behind the sign mounting to divert incidental water away from the interior.
Materials Impacting Waterproofing
You must select compatible materials: EPDM, TPO or polyurethane membranes behave differently with heat and UV, while stainless-steel (316) sleeves resist corrosion in coastal sites. Fastener type, sealant chemistry, and substrate (EPS vs mineral wool) affect bond and long-term performance; incompatible pairs lead to adhesive failure or galvanic corrosion at anchor points.
Perform mock-ups and compatibility testing (adhesion, accelerated UV, and thermal cycling) before final selection: for example, verify membrane-to-metal bond strength and use butyl or silicone boots where differential movement exceeds 10 mm. Also plan for field flood or ASTM E1105-style testing after install, and specify inspection intervals-every 3-5 years for exposed, high-wind sites-to detect seal degradation early.
Safety Standards in Sign Wall Penetration
Your safety strategy must align structural anchorage, electrical code compliance and waterproofing continuity so penetrations don’t create life‑safety or liability hazards; cite ASCE 7 for wind loads (design speeds commonly 90-150 mph in high‑wind zones), NEC Article 600 for sign wiring, and OSHA fall‑protection requirements during installation, while specifying anchor pull‑tests at 2× the service load and corrosion‑resistant materials (316 stainless in marine exposures) to limit long‑term failure modes.
Safety Regulations and Guidelines
You should follow IBC provisions for attachments and NFPA/NEC rules for electrical enclosures, plus OSHA 1926 and 1910 standards for worker protection during installation and maintenance; obtain local permits, supply sealed PE shop drawings, and ensure sign assemblies meet wind and seismic forces per ASCE 7 with documented calculations submitted to the Authority Having Jurisdiction.
Risk Management Practices
You will minimize risk by requiring site‑specific hazard analyses, third‑party anchor pull‑testing (commonly 2× design load), integrated flashing or back‑pans to preserve waterproofing, scheduled inspections every 6-12 months, and a documented maintenance and emergency response plan tied to owner responsibilities and warranty obligations.
For example, after a 2019 retrofit in coastal Florida, replacing corroded carbon‑steel anchors with 316‑SS, adding a concealed back‑pan, and performing third‑party pull tests at 2.5× design load eliminated leaks and anchor migration; best practice includes torque‑controlled installations, manufacturer certification of anchors, QA hold points, inspection logs, 3-5 year re‑testing cycles (every 6 months in severe corrosive sites), and warranties of 5-10 years to transfer accountability through the project lifecycle.
Case Studies: Successful Sign Wall Penetration Installations
Several projects show how integrated detailing prevents leakage and preserves fire ratings; you can use these as templates. For further technical context see Construction Concerns: Penetrations of Rated Wall and Floor Assemblies, which highlights coordination issues you should plan for.
- 1) Urban Retail Façade, Chicago (2019): 12 m channel sign with 6 penetrations (50 mm steel sleeves). You used a continuous membrane wrap + 25 mm back-pan and post-installation 48‑hr hose test showed zero ingress; firestop reinstated with an ASTM E814-rated 2‑hour system around each sleeve.
- 2) Shopping Center Retrofit, Los Angeles (2021): 24 penetrations for illuminated letters, average sleeve Ø40 mm. You reduced installation time by 30% by prefabricating flanged sleeves with integrated EPDM boots and maintained NFPA 70 cable separation; pressure decay test passed at 0.5 kPa over 1 hour.
- 3) High-rise Hotel, Miami (2020): Mounting mast for rooftop sign used two 100 mm penetrations through a 220 mm concrete wall. You specified granulated flashing and a 75 mm drainage plane; third-party water ponding tests and a 2‑hour firestop verification avoided scope backcharges.
- 4) Transit Hub, London (2018): 8 LED blade signs with insulated conduits. You required 15 mm clearance, intumescent collars rated for 90 minutes, and a membrane wrap overlap of 150 mm; thermal cycling over 12 months showed no sealant failure.
Examples of Compliance
You can meet waterproofing and safety rules by combining tested firestop systems (ASTM E814/UL 1479) with membrane continuity and mechanical sleeves. Specify sleeve diameters, overlap distances (min 75-150 mm), and post-installation water tests; several projects achieved compliance with documented 48-72 hour hose or chamber tests and preserved 1-2 hour ratings.
Lessons Learned
You often find failures stem from omitted back-pans, insufficient sleeve stub length, or missed coordination between sign and electrical trades; addressing these early avoids rework and preserves ratings. Plan for clearance, drainage, and documented testing in your contract documents.
More info: you should require shop drawings showing sleeve depths (min 25-50 mm beyond insulation), membrane wrap overlaps (minimum 100 mm), and specific sealants (polyurethane or silicone with 25% movement capability). Also mandate third-party verification-water tests, firestop inspection reports, and a sign-install punch list-to quantify acceptance criteria and reduce warranty claims.
Common Challenges and Solutions
Penetrations commonly fail due to poor flashing, thermal movement, corrosion and anchorage misalignment; you should specify integrated flashings with a minimum 2% slope, back‑pans and membrane wraps with 25 mm overlaps, stainless‑steel anchors in corrosive environments, and allow slotted holes or compression gaskets for differential movement; schedule annual inspections and use AAMA 501.2 or ASTM E1105 water testing after installation to verify performance.
Addressing Waterproofing Failures
When you find leaks, start with targeted diagnostics-flood testing per ASTM E1105 or AAMA 501.2 plus infrared scans-to pinpoint breaches; repair by removing failed sealant, applying compatible polyurethanes, installing self‑adhered flashing or liquid‑applied membranes, and adding a back‑pan for a secondary drainage plane, then retest at design pressure to confirm remediation.
Ensuring Safety Compliance
You must size sign anchors to resist ASCE 7 wind loads and provide fall‑protection anchors rated at 5,000 lb (22.2 kN) per OSHA when used for personal arrest; specify corrosion‑resistant materials (AISI 316 in coastal zones), document load combinations and factor of safety, and submit calculations and shop drawings for building official approval.
For ongoing compliance you should require pull‑tests at 125% of design load on a sample of anchors after installation, perform visual and torque inspections annually and after storms exceeding design wind (for example >90 mph), use chemical anchors per manufacturer embedment and cure times (typically 24-72 hours), and maintain material certificates, test reports and inspection logs for inspectors and insurers.
Future Trends in Sign Wall Penetration Standards
Expect regulatory and industry attention to migrate toward integrated digital submittals and performance-based criteria, so you’ll see BIM models carrying ASTM E331/E547 test links, ASCE 7 wind-load inputs (130+ mph in some zones) and manufacturer-specific membrane details to reduce ambiguity at the interface between structure, electrical and waterproofing.
Innovations in Materials and Methods
You’ll adopt AISI 316 stainless anchors for corrosive environments, composite anchors to lower thermal bridging, and prefabricated back-pans or membrane-wrapped columns that arrive sealed; suppliers increasingly provide modular brackets with factory-applied TPO/EPDM flashings and ASTM C920‑rated sealants to cut field penetrations and installation variability.
Evolving Safety Norms
You must integrate OSHA 29 CFR 1926 fall-protection rules (6 ft threshold), NEC (NFPA 70) wiring clearances, and IBC anchorage requirements into permit packages; authorities now expect documented torque and proof-load settings, lockout/tagout coordination, and signed inspection checklists before work on façades proceeds.
In practice you should require proof-load testing at about 1.5-2× the working load, mandate visual and pull inspections at installation and annually (or after severe storms), and retain digital records (RFID/QR-tagged anchors, photos, timestamps); owners enforcing these steps report fewer leak-related repairs and clearer forensic data when failures do occur.
Final Words
Hence you should ensure sign wall penetration standards require proper flashing, continuous membrane detailing, sealed sleeves and tested sealants to prevent water ingress, plus firestop systems and structural anchorage that meet NFPA/ICC/ASTM/AAMA or local code requirements. Specify manufacturer-approved penetrations, periodic inspection and documented testing so your waterproofing integrity and occupant safety are maintained throughout the sign life cycle.
FAQ
Q: What are sign wall penetration standards and how do they affect waterproofing and safety?
A: Sign wall penetration standards are technical requirements governing how signs, anchors, conduit and mounting hardware pass through exterior wall assemblies. They define allowable opening sizes, required flashing, sealant types, fastening methods and clearances to prevent water ingress, preserve structural integrity and limit fire or smoke spread. Compliance reduces risk of leaks, mold, corrosion and attachment failure, and ensures electrical and fire-safety measures (e.g., firestopping, bonding/grounding) are integrated with waterproofing details.
Q: Which waterproofing methods and materials are commonly mandated at sign penetrations?
A: Standards typically specify primary waterproofing (continuous membrane or cladding detail), secondary local flashing and backpan systems, and compatible sealants (polyurethane, silicone, silyl-terminated polyether) rated for movement and UV exposure. Compression gaskets, custom metal flanges, self-adhered flashing tapes and closed-cell backer rods are used to form multi-layered seals. Materials must be compatible with substrate and adjacent finishes, meet movement-capacity and adhesion criteria, and be installed per manufacturer’s instructions to maintain warranty and long-term performance.
Q: How do structural and fire-safety requirements interact with waterproofing at penetrations?
A: Structural requirements control anchor embedment, load transfer, and allowable pull-out or shear forces; overdriven anchors or improper cutting can compromise waterproofing. Fire-safety standards require firestopping and compartmentation where penetrations cross rated assemblies; firestop systems must be integrated without creating leak paths and use approved sealants or collars that balance fire resistance and water seal performance. Coordination ensures anchors, rated penetrations and sealants meet both mechanical load and fire-resistance criteria while maintaining continuous drainage and vapor control.
Q: What testing and inspection practices verify that sign wall penetrations meet waterproofing and safety standards?
A: Visual inspections confirm correct flashing, sealant bead size, secondary drainage and proper substrate prep. Water testing (flood testing, simulated rain or spray tests) verifies leak tightness under realistic conditions. Pull tests and torque checks validate anchor capacity; smoke or firestop inspections confirm continuity of rated systems. Documentation of material batch numbers, installation photos and third-party test reports are commonly required for acceptance and warranty activation.
Q: What installation and documentation practices are required to ensure compliance over a sign’s service life?
A: Best practice requires pre-installation mock-ups, approved shop drawings showing flashing, sealant joints, anchor details and interface with membranes. Use manufacturer-approved materials, trained installers, and follow written sequences for substrate preparation, priming, flashing and sealant tooling. Maintain as-built records, material data sheets, cure times, test results and inspection sign-offs. Establish routine maintenance schedules for re-sealing, anchor checks and vegetation/soil control to preserve waterproofing and safety performance.