
There’s much to consider when planning shopping center sign installation: you need to obtain permits and meet local zoning, verify structural and electrical compliance, choose durable materials and efficient lighting, optimize placement for visibility and tenant branding, and hire qualified installers who follow safety and inspection standards; knowing timelines, maintenance requirements, and realistic budgeting helps you avoid delays and ensures long-term performance.
Key Takeaways:
- Permits and local codes: confirm zoning, size, height, illumination and historic-district rules and obtain required permits before ordering signs.
- Structural engineering and mounting: verify building or pylon capacity, wind and seismic loads, and use engineered anchoring details to prevent failures.
- Electrical and lighting compliance: hire a licensed electrician, follow electrical code for wiring, grounding and disconnects, and consider LED and controls for energy efficiency.
- Design and tenant guidelines: adhere to the shopping center’s sign program for materials, colors, logo placement and visibility to ensure cohesive branding and approval.
- Logistics, safety and maintenance: select insured, licensed installers with lift/crane plans, coordinate tenant schedules and access, and get warranties plus a maintenance plan for longevity.
Importance of Shopping Center Signage
Signage ties design, compliance, and operations together: you must factor zoning and electrical permits (municipal lead times commonly run 4-12 weeks), ADA wayfinding, and tenant identity standards into timelines. Fabrication typically takes 3-8 weeks depending on materials like aluminum, acrylic, or LED modules, and installation may require crane time and traffic control. Getting these details right protects leasing velocity, reduces tenant turnover, and preserves your center’s curb appeal and long‑term NOI.
Enhancing Visibility
You improve sightlines by matching sign type to context: pylon signs and monument signs serve highway visibility while channel‑letter façade signs aid close‑range recognition. Use the 1‑inch-per-10-15‑feet rule for letter height to ensure legibility, mount highway‑facing IDs 20-30 feet high for 500+ foot visibility where allowed, and prefer LED illumination for crisp night contrast and roughly 50-70% lower energy use than legacy neon.
Attracting Customers
You drive visits by aligning messaging with behavior: digital displays let you run time‑of‑day promos, tenant spotlights, and wayfinding that respond to footfall. Prioritize a clear call‑to‑action, bold headlines, and high‑contrast palettes so passersby process the offer in under two seconds. Coordinate sign content with social and in‑center events to amplify reach and convert awareness into immediate foot traffic.
To deepen impact, you should A/B test creative and measure lift with POS sales, footfall counters, or promo‑redemption codes; QR codes or short URLs make tracking simple. Schedule content rotations-morning commute, lunch, evening shoppers-and swap static panels seasonally. Also audit visibility twice yearly for fading, backlight failure, or obstructed sightlines so your signage stays an active acquisition channel rather than a neglected asset.
Types of Shopping Center Signs
You’ll typically choose among five sign categories-building, monument, pylon, directory and directional-each affecting visibility, code review and cost. Channel letters and cabinet signs work on facades; monuments anchor entries at roughly 3-6 ft high; pylons reach 20-60 ft for road visibility; tenant directories list 8-30 businesses; directional signs use arrows sized 12×18-24×36 inches. You should size and illuminate signage to match sightlines, local setbacks and peak vehicle speeds to maximize discovery.
- Building signs: channel letters, raceways, LED illumination for storefront identity.
- Monument signs: low-profile entry markers in masonry, typically 3-6 ft tall.
- Pylon signs: tall, 20-60 ft structures for highway exposure and multi-tenant IDs.
- Directory signs: multi-panel boards listing 8-30 tenants near main circulation points.
- Perceiving sightlines and approach speed guides whether you favor a monument, pylon or larger facade letters.
| Building Signs | Channel letters, neon/LED, letters ~1-4 ft, mounted flush or on raceway |
| Monument Signs | Masonry/concrete base, 3-6 ft height, changeable copy or digital face |
| Pylon Signs | 20-60 ft tall, double-faced cabinets, highway-grade visibility |
| Directory Signs | 8-30 tenant panels, 2-4 ft tall, modular panels for tenant turnover |
| Directional Signs | 12×18-24×36 in arrows, reflective or illuminated, placed at intersections |
Building Signs
You’ll use building signs to brand storefronts and anchor tenants, often with channel letters (halo-lit or face-lit), cabinet signs or digital displays; letters commonly range 1-4 ft for readability at 50-200 ft. Materials are typically aluminum and acrylic with LED modules to cut energy by roughly 60-80% versus legacy neon. Verify facade mounting loads, roof penetrations, and permit requirements, and coordinate color contrast so your sign reads from curb lanes and parking fields.
Monument Signs
You should place monument signs at primary entrances to create a low-profile identity marker; typical heights run 3-6 ft with bases of stone, brick or cast concrete and faces that accept changeable copy or LED inserts. They perform well for pedestrian-scale centers and allow landscaping to integrate into the base for aesthetic and sightline control.
For engineering, you’ll need a foundation sized to local frost depth and wind loads; many jurisdictions require sealed structural drawings for monuments over 4 ft tall. Expect fabrication and installation costs to vary widely-small single-tenant monuments commonly range $3,000-$10,000, while multi-tenant or illuminated digital monuments can run $15,000-$60,000. Plan conduit routing, access panels for LED drivers, and a maintenance schedule for seals and paint.
Directional Signs
You’ll deploy directional signs to control vehicle and pedestrian flow; common placard sizes are 12×18 to 24×36 inches, mounted 3.5-5 ft above ground for driver sightlines or 4-7 ft for pedestrian readability. Use high-contrast legends, 3-6 inch arrow stems for vehicular signs, and reflective sheeting for night legibility. Place signs at every entrance and at internal intersections-typically 6-12 signs for a 100,000-300,000 sq ft center.
When detailing wayfinding, you should create a hierarchy: primary entries (large arrows and names), secondary intersections (directional arrows and parking info), and tertiary pedestrian cues (smaller signs or bollard-mounted plates). Integrate regulatory requirements such as ADA where tactile or informational signage applies, and coordinate colors and symbols so drivers process instructions in under two seconds at typical center speeds of 5-15 mph.
Signage Regulations and Permits
Municipal codes and utility rules shape what you can build: expect requirements for zoning classification, sign area, illumination, setbacks, ADA access and electrical hookups. You’ll often need structural calculations for freestanding pylons over 20-30 ft and an electrical permit for all illuminated signs. Timelines vary-plan checks can take 2-8 weeks-and fees commonly range from $50 to $1,500; factor these into your project schedule and budget from the outset.
Local Zoning Laws
Many jurisdictions set specific limits you must follow: pylon heights commonly cap at 20-60 ft, sign area often limited to 100-300 sq ft, and building-mounted signs typically cannot exceed 10-15% of the façade. You should check setback, sight-line, and historic-district overlays, plus hours or lumen caps for illumination (some towns require dimming after 10-11pm). Shopping centers frequently operate under a master sign program that overrides general district rules.
Permit Acquisition Process
Start with a pre-application meeting, then submit a scaled site plan, elevations, structural calcs, electrical schematics and proof of contractor license for plan review. You’ll need landlord/HOA sign-off and possibly county/state utility clearance. Plan-check fees and reviews typically take 2-8 weeks; expect inspections for footings, electrical connections and final sign placement before receiving a certificate of approval.
Common missing items that delay approval include incomplete engineering stamps, unclear lighting specs (lumens/nits), or absent proof of insurance; include these up front. You can often expedite review for an added fee, and working directly with the city planner or hiring a local sign contractor familiar with the jurisdiction cuts re-submittals. For example, a suburban county approved a complete shopping-center pylon package in 10 business days when all documents and landlord authorization were included.
Design Considerations
Balance scale, materials and sightlines against local sign code and the tenant mix: pylon signs commonly range 20-60 feet tall while monument signs sit 3-8 feet high, and storefront letters often fall between 12-24 inches for pedestrian zones. You should map viewing distances, entry points and background clutter, then specify materials (aluminum, acrylic, LED modules) that meet wind, maintenance and aesthetic targets set in the center’s sign program.
Branding and Aesthetic Consistency
You must keep logo proportions, clear space and color fidelity across all sign types: enforce a minimum clear space of roughly 20% of the logomark, use Pantone or CMYK matches with ±2 ΔE tolerance for prints, and set LED color temperature (e.g., 2700-3000K for upscale centers, 4000-5000K for contemporary centers). Match materials to the center-backlit acrylic for modern malls, painted metal or carved stone for lifestyle centers-to preserve a unified identity.
Legibility and Visibility
Apply the “1 inch of letter height per 10 feet of viewing distance” rule for basic legibility and opt for high-contrast palettes (dark on light or vice versa); choose sans-serif typefaces, avoid narrow or script fonts, and size stroke widths to roughly 10-15% of letter height. You should also account for mounting height, angle and ambient light when specifying illumination levels and finish reflectivity.
For practical examples, a pylon sign viewed from 60 feet needs about 6 inches of letter height, while a highway-facing sign at 200 feet needs closer to 20 inches. Specify 10-15% letter stroke width, minimum inter-letter spacing to prevent crowding, and use matte backgrounds to reduce glare; for illumination, test at dusk to ensure channel letters read clearly from expected approach speeds (30-60 mph) and distances.
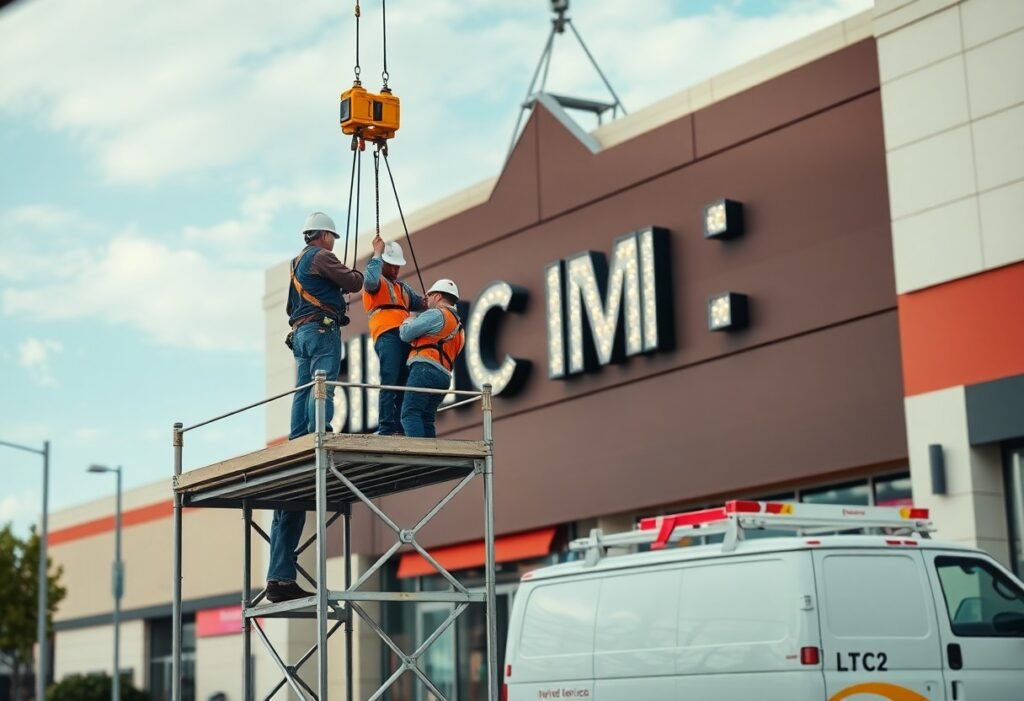
Installation Process
Site preparation begins with a site survey, structural engineer stamp and permitted anchor design; you’ll typically see permit approval take 2-6 weeks. Crews install anchors (M12-M20 bolts common), run conduit, and connect LED power supplies, then test photometric output and sign controls. For rooftop or pylon signs plan for crane time and a 3-6 person crew; final municipal inspections and as-built drawings complete the process.
Choosing the Right Installation Company
Select firms with 5+ years installing mall or multi-tenant signage, a licensed engineer on staff, and public liability insurance and bonds. You should request shop drawings, an on-site mock-up, references for at least two recent shopping-center projects, and proof they pull permits; typical crews are 3-6 installers with a certified rigging foreman and OSHA/WCB compliance documentation.
Installation Timeline
Typical timelines run 3-8 weeks from kickoff: permits (2-6 weeks), fabrication (2-4 weeks) and on-site install (1-3 days per sign). You’ll see faster turnarounds with local fabricators and pre-approved designs, while custom routed faces, specialty finishes or electrical upgrades add 1-2 weeks.
You should expect sequencing like: site survey and geotech 1-3 days, engineering and stamped drawings 3-10 days, concrete pad and anchor work with 48-72 hour cure, electrical trenching/pull 1-2 days, crane mobilization/hoisting 1 day, then testing and final inspection 1-2 days; weather, tenant access windows and change orders commonly extend schedules by weeks.
Maintenance of Shopping Center Signs
Ongoing upkeep extends sign lifespan and protects your investment; schedule routine checks every 3-6 months and budget roughly 1-3% of the original sign cost annually for maintenance. Inspect lighting, seals, paint and structural anchors, and follow installation guidance such as Best Practices of Sign Installation for Retail Businesses when updating parts. Proactive service reduces downtime and keeps tenant visibility high.
Regular Inspections
Plan inspections every 3 months for high-traffic centers and every 6 months for smaller plazas; you should check fastener torque, anchor plate condition, water intrusion at seams, LED lumen output, and photometric compliance. Use a lux meter to compare readings to design specs, log ballast/driver temperatures, and verify IP ratings and gaskets. Document findings with photos and timestamps so you can track paint fade, corrosion rates, or recurring electrical faults over time.
Repair and Replacement
When repairing, prioritize safety hazards first-exposed wiring, loose faces, or failing anchors-and schedule module or driver replacements as needed. Typical fixes include swapping LED modules or drivers, replacing acrylic faces, re-caulking seams, and re-coating weathered cabinets; LED module replacements commonly run $60-$200 per module depending on size. For structural repairs you’ll need engineer sign-off and permit amendments before welding, anchor replacement, or major cabinet work.
For larger replacements plan 1-3 weeks from permit to completion-emergencies can often be addressed within 24-72 hours when a sign poses a hazard. You’ll typically require a bucket truck or crane, certified lift operators, and OSHA-compliant fall protection; hazardous waste rules apply when disposing of old lamps and ballasts. Upgrading fluorescents to LEDs often cuts energy use 50-70%, producing a payback in roughly 2-4 years while reducing ongoing maintenance and downtime.
Summing up
Upon reflecting, you must ensure permits and zoning compliance, confirm structural and electrical capabilities, plan for optimal visibility and maintenance access, and choose durable, brand-aligned materials and lighting; coordinating with property managers and qualified installers ensures safety, cost control, and on-time completion so your signage enhances tenant recognition and long-term performance.
FAQ
Q: What permits and approvals are typically required before installing a shopping center sign?
A: Local sign permits and building permits are usually required, plus zoning clearance to confirm allowed size, height and placement. You will often need landlord or shopping center management approval, and in some cases homeowner association or historic-district review. Electrical permits and inspections are required for illuminated signs; if the sign is tall or near flight paths, an FAA notice may be needed. Allow 2-12 weeks for review depending on jurisdiction and complexity, and verify any tenant-specific or center master-sign criteria before submitting plans.
Q: How do structural and engineering requirements influence sign design and installation?
A: Signs must meet structural codes for wind, seismic loads and snow where applicable, so a licensed structural engineer should provide stamped calculations for foundations, anchor bolts and mounting frames. Soil conditions determine foundation type and depth; rooftop mounts require checking roof load capacity and waterproofing strategies. Large pylon or monument signs often need deep footings and concrete anchors, and access clearances for cranes or lifts must be planned during site planning to avoid last-minute changes.
Q: What electrical and illumination considerations should be addressed during planning?
A: Identify power source, load calculations and whether a new circuit, transformer or utility service upgrade is needed. Conduit runs, trenching, conduit depth and utility locates must follow code; include weatherproof disconnects, surge protection and proper grounding. Specify LED drivers, dimming and photocell/timer controls to meet local light ordinances and energy standards. Provide access panels for maintenance, and schedule electrical inspection after installation before energizing the sign.
Q: How do location, visibility and branding requirements affect sign placement and appearance?
A: Sightlines, approach speeds and surrounding structures determine optimal letter height, face orientation and illumination levels for readability day and night. Follow the shopping center’s master signage program and brand guidelines for typeface, colors and logo proportions; ensure color calibration and consistent illumination for corporate identity. Consider setbacks, easements and sight-distance requirements for traffic safety, and coordinate with wayfinding signs to avoid visual clutter that reduces impact.
Q: What are typical timelines, costs, and ongoing responsibilities after installation?
A: Project phases include concept and design (1-4 weeks), engineering and shop drawings (2-6 weeks), permitting (2-12 weeks), fabrication (3-8 weeks) and installation (days to weeks). Costs vary by size, materials, illumination and site work such as foundations or electrical upgrades; digital displays raise both initial cost and ongoing energy/maintenance expenses. After installation maintain a service plan for LED drivers, weather seals and structural fasteners, keep permit and inspection records, and schedule periodic inspections to comply with codes and protect warranty coverage.