
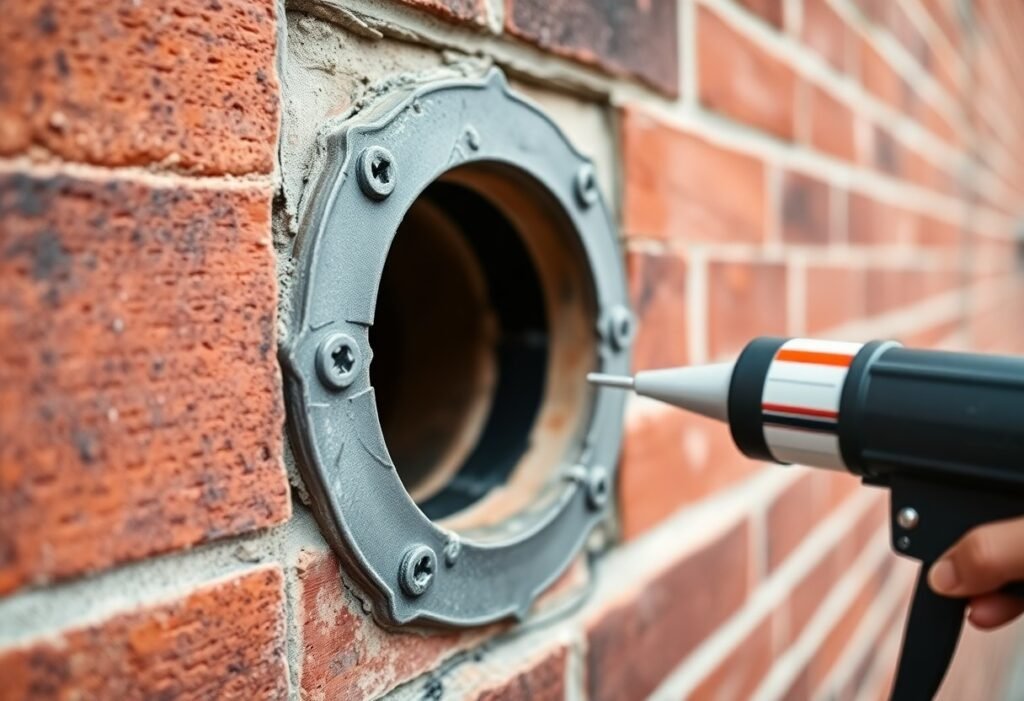
Sealing sign penetrations requires you to inspect the opening, remove debris, install a waterproof backing or backer rod, apply compatible exterior-grade sealant and neoprene or rubber gaskets around fasteners, and flange or flash around the sign. You should select materials rated for UV and temperature, ensure proper tooling for adhesion, and schedule periodic inspections and resealing.
Key Takeaways:
- Survey each penetration (size, material, movement) and plan a system that combines sealant, backer rod, and flashing appropriate for the substrate and loads.
- Prepare surfaces: clean, dry, remove old sealant, and prime porous substrates to ensure adhesion and long-term performance.
- Use a backer rod/bond-breaker to control sealant depth (typically 2:1 width-to-depth) and select a flexible, compatible sealant (silicone, polyurethane, polysulfide, or hybrid) rated for UV and expected joint movement.
- Install mechanical or integral flashings, collars, EPDM boots, or stainless-steel collars for abrupt transitions and large conduits to provide a secondary waterproof barrier.
- Design for movement and serviceability: allow joint movement, slope or drainage where possible, and schedule regular inspections and resealing as part of maintenance.
Understanding Sign Penetrations
Definition of Sign Penetrations
Sign penetrations are the physical openings where mounting bolts, conduit, raceways or pole bases pass through roofs, walls or cladding; you assess sizes from 1/4″ anchor bolts to 6″ raceways and note material differences like masonry, metal or EIFS. You evaluate movement, thermal expansion and exposure to drive appropriate sealing methods and attachment details.
Common Types of Sign Penetrations
You encounter several recurring penetration types: anchor bolts through parapets, conduit for LED power, channel-letter raceways, pole-base plates and transformer/electrical boxes; each presents distinct leak paths and movement profiles, so you select flexible versus rigid sealants accordingly and consider mechanical protection where vibration or impact is likely.
- Anchor bolts and threaded rods that pass through wall or roof membranes.
- Electrical conduits and flex raceways feeding low-voltage fixtures.
- Channel-letter raceways and backer boxes with multiple small penetrations.
- Pole-base plates with grout or expansion gaps at the footing.
- This highlights why you must match sealant type and detailing to penetration geometry and substrate.
| Anchor bolts / threaded rods | Typical Ø: 1/4″-1″; use backer rod + polyurethane sealant; consider sleeve for movement |
| Electrical conduit | Typical Ø: 1/2″-2″; use watertight conduit fittings, neoprene gaskets, and sealed transition boxes |
| Channel-letter raceways | Typical raceway width: 1″-3″; seal seams with silicone, use flashing at wall intersections |
| Pole base plates | Gap often 1/8″-1/2″; use compression gasket or layered sealant with mechanical anchors |
| Transformer / junction boxes | Boxes 4″-12″; flange-mounted with continuous gasket and counterflashing for weather resistance |
You should expect channel-letter raceways to present multiple small gaps-typical LED raceways are 1-3″ wide and often require continuous silicone at the backer, a closed-cell backer rod in larger voids, and stainless steel fasteners with neoprene washers to prevent galvanic corrosion; in retrofit cases you may seal dozens of small penetrations per sign, so plan labor and materials accordingly.
- Polyurethane sealants for high-movement joints and roof-to-sign transitions.
- Neutral-curing silicone for non-porous substrates and UV-exposed edges.
- EPDM or neoprene gaskets for flange-mounted boxes and pole bases.
- Closed-cell backer rod to control sealant depth in gaps over 1/8″.
- This combination of products often delivers multi-decade resistance when detailed and maintained properly.
| Polyurethane sealant | Best for movement joints; life 10-20 years; adheres to porous substrates |
| Neutral silicone | UV-stable for metal/glass; life 10-20 years; avoids substrate staining |
| EPDM gasket | Reusable for flange seals; life 20+ years; resists ozone and temperature cycling |
| Backer rod | Controls sealant depth; inert material; use Ø sized 25%-50% larger than gap |
| Metal flashing | Shields large transitions; use stainless or coated flashing with 1″ minimum overlap |
Importance of Sealing
Sealing sign penetrations reduces hidden failure modes that drive maintenance costs and safety risks; a single leaking penetration can raise timber moisture above 20% and initiate decay or corrode fasteners within a few years, turning a $30-$100 sealing job into hundreds or thousands in repairs. You mitigate liability, extend service life, and avoid water pathways that compromise insulation, lighting, and finishes by treating penetrations as part of the envelope rather than cosmetic trim.
Preventing Water Intrusion
You stop water entry by combining proper detailing with compatible materials: use a closed-cell backer rod sized to the gap (typically 6-12 mm / 1/4-1/2 in), apply a primer when required, and tool a continuous sealant bead (silicone, polyurethane, or high-modulus MS polymer) to ensure adhesion. Flashing the sign flange, slope-cutting for drainage, and leaving vent/drain holes where water can’t accumulate are practical steps that reduce standing water and pressure-driven leaks.
Protecting Structural Integrity
You protect structure by preventing moisture-driven deterioration of substrate and fasteners; sustained wood moisture over 20% promotes decay, and corroding steel bolts lose cross-section and shear capacity, increasing failure risk. Schedule inspections every 1-2 years in exposed sites and reseal joints on a 5-10 year cycle depending on UV and weathering to catch issues before they undermine anchors or framing.
In practice, specify corrosion-resistant hardware (316 stainless in marine zones, hot-dip galvanized inland) and isolate dissimilar metals with dielectric washers to avoid galvanic attack. Install through-bolts with interior backing plates and a continuous bead of sealant under the washer face, and provide weep holes or sloped recesses to drain incidental moisture; these measures, combined with documented inspection logs, have prevented anchor failures in municipal sign programs and extend service life by years.
Materials for Sealing
Types of Sealants
You’ll choose silicones, polyurethanes, butyls, epoxies, or acrylics based on movement capability, substrate, and UV exposure; silicone typically offers 20-25 year outdoor life and strong UV resistance, polyurethane provides high bond strength for metal-to-concrete, butyl stays tacky for retrofit flashing, epoxy serves structural potting, and acrylics are paintable and budget-friendly. Check ASTM C920 movement classes (±25% common) when sizing joints and select neutral-cure silicones near sensitive electronics.
- Silicone: flexible, UV-stable, best for glass and aluminum joints.
- Polyurethane: high adhesion and abrasion resistance for metal and concrete.
- Butyl: good for retrofit flashing and temporary seals on tight fits.
- Epoxy: used where structural fill and rigid potting are required.
- Recognizing product certifications (ASTM, NSF, marine-grade) speeds correct selection for environment and code compliance.
| Silicone | Flexible, UV-resistant, ~20-25 year life, non-paintable; ideal for glazing and exterior seals |
| Polyurethane | Strong adhesion, abrasion-resistant, good for metal-to-concrete; full cure in ~7 days for 10 mm depth |
| Butyl | Tacky, excellent for retrofits and lap joints, low movement capability, long-term tack retention |
| Epoxy | Rigid structural fill, bonds to many substrates, used for potting and bolt encapsulation |
| Acrylic | Paintable, economical, limited movement capacity, best for interior or painted façades |
Recommended Products
You can rely on neutral-cure silicones like Dow Corning 791/795 for long-life glazing and sign bases, SikaFlex-1a (polyurethane) for strong metal-to-masonry adhesion, Tremco Vulkem for breathable exterior joints, and 3M Marine Adhesive Sealant 5200 where semi-permanent, water-immersion performance is required; many manufacturers list 24-48 hour skin time and 7-14 day full cure ranges.
When you specify, match product chemistry to substrate and expected movement: prime porous concrete and aluminum with manufacturer-recommended primers, use a compressible closed-cell backer rod sized slightly larger than the joint, and design joint depth ≈ width/2 to control stress. For field examples, installers replacing 12 sign bases used SikaFlex with primer and reported zero leaks after two winter seasons on coastal sites.
Sealing Techniques
Use a layered approach: backer rod to control bead depth, high‑quality sealant for the joint, and compression gaskets where wiring passes through metal. For electrical penetrations follow manufacturer guidance-see Sealing Electrical Penetrations-and size beads to 6-12 mm (1/4-1/2 in) for typical conduit entries. In one municipal sign retrofit, switching from tape to a neoprene gasket plus a 10 mm polyurethane bead cut leaks from weekly to zero over 18 months.
Surface Preparation
Start by removing paint, corrosion and old sealant to bright metal or stable substrate; use a solvent wipe per ASTM D5402 if oils are present. Light abrasion with 80-120 grit or a wire brush improves mechanical adhesion, and you should apply primer on anodized aluminum or galvanized steel-allow 24 hours dry after power washing and ensure substrates are below 5% surface moisture before sealing.
Application Methods
Tooling the sealant immediately after extrusion ensures wet contact and a concave profile; apply at a 45° nozzle angle and use a backer rod sized 25-50% larger than the gap to set proper joint depth. For vertical sign plates you should gun at a steady speed to avoid air pockets, and expect silicone skin times of 10-20 minutes with full cure in 24-72 hours depending on thickness and humidity.
For larger penetrations, consider pourable urethane or expanding foam sealants behind a structural gasket then finish with a paintable polyurethane or neutral‑cure silicone; neutral cures avoid corrosion on sensitive metals. In practice, a 20 mm conduit typically takes a 10 mm rod and 6-8 mm sealant cover-test a mockup on a sample panel and measure adhesion (peel test) and leak rate before full installation to validate your chosen method.
Maintenance and Inspection
Schedule inspections based on exposure: biannually for typical sites, quarterly for coastal or high-traffic locations, and immediately after severe storms. You should photograph each penetration, log sealant age and batch, and note any 1-3 mm gaps, adhesive failure, or rusted fasteners. Use a borescope for hidden cavities and keep a maintenance record to compare degradation rates; many silicones show visible aging by year 7-10 while polyurethanes may need attention by year 3-5.
Regular Checks
On each visit, probe sealant with a blunt tool to assess tack and elasticity, check backer rod exposure, and measure joint width and movement potential. You should test a sample adhesion patch when suspecting chemical breakdown and verify anchor torque against the original spec. Prioritize penetrations near roof edges and flashings; those typically fail first due to wind-driven rain and UV, so inspect these after any 25+ mm rainfall event or high-wind incident.
Repairing Damaged Seals
When you find failed seals, remove old sealant and contaminated backer rod to sound substrate, abrade or solvent-clean surfaces, and apply primer if required by the sealant manufacturer. Insert a correctly sized backer rod to control bead depth (aim for a 2:1 width-to-depth ratio), then apply a compatible sealant with a continuous, void-free bead and tool within the working time; allow 24-72 hours curing depending on temperature and ambient humidity.
Perform an adhesion test patch before full replacement to confirm compatibility; for movement joints select sealants rated for ±25% or greater if thermal cycling causes frequent displacement. You should also replace corroded anchors with stainless steel or coated fasteners, document product lot numbers for warranty claims, and plan rope access or scaffolding for high signs, ensuring fall protection and a confined-space assessment where applicable.
Best Practices
Adopt a systematic inspection and documentation routine: you should schedule inspections every 6 months and after major weather events, log sealant batch numbers and photos, and combine visual checks with nondestructive tests such as a 5 psi water-fog test or infrared scans to find subsurface moisture; use prioritized reseal lists and lifecycle-cost tracking to guide interventions.
Proper Installation
Anchor hardware to manufacturer torque-typically 15-40 N·m-while you isolate the penetration with a closed-cell backer rod sized 25-50% larger than the gap; aim for a depth-to-width ratio of about 1:2 with minimum 6 mm depth, prime porous substrates, apply continuous sealant beads, and allow skin-over times (silicones ~30-60 minutes) before tooling for reliable adhesion.
Long-term Maintenance Strategies
Establish reseal cycles based on exposure: you should plan for 5-7 year replacement in high UV/coastal environments and 8-10 years inland, inspect seals semiannually and after storms, and keep a service kit with matching sealant, primers, and spare gaskets so you can perform fast repairs that prevent corrosion and electrical failures.
During reseal work you should remove old material mechanically, solvent-wipe with isopropyl alcohol, verify substrate soundness, reinstall a properly sized backer rod, and apply a compatible sealant; then run a 10-minute 5-10 psi spray test and monitor for leaks 24-48 hours. For coastal signs pick UV-stable silicone or polysulfide, while painted steel often performs best with a primed polyurethane system.
Conclusion
Following this, you should clean and dry the penetration, install a compressible backer rod, prime surfaces if needed, and apply a compatible sealant (polyurethane or silicone) tooled to bond; add flashing or rubber boots around posts, tighten fasteners with waterproof washers, slope surfaces to shed water, and schedule periodic inspections and resealing so your sign mount stays watertight.
FAQ
Q: What are sign penetrations and how do they allow water intrusion?
A: Sign penetrations are holes, sleeves, bolts or conduits where sign supports, electrical feeds or mounting hardware pass through exterior cladding, roof membranes or parapets. If those penetrations are not properly flashed, sealed and integrated with the surrounding weather barrier, water can follow seams and fasteners into the wall or roof assembly. Common failure modes include gaps around sleeves, deteriorated sealant, missing or poorly-lapped flashing, corroded fasteners that open voids, and thermal movement that breaks the seal.
Q: Which materials and sealants are best for sealing sign penetrations?
A: Use a system approach: stainless-steel or hot-dip‑galvanized fasteners with neoprene or EPDM washers, a closed-cell backer rod sized slightly larger than the gap, and a compatible flexible sealant such as a high‑performance polyurethane, polysulfide, or non‑staining neutral‑cure silicone approved for the substrates. For heavy loads or conduit boots use molded EPDM boots or metal flashing collars integrated into the membrane. Select UV‑resistant, paintable products where required and follow manufacturer substrate-compatibility charts and primers for adhesion to metal, masonry or membrane materials.
Q: What is the step-by-step method for sealing new sign penetrations to prevent leaks?
A: 1) Plan location to minimize penetrations and align with flashing/roof seams. 2) Use sleeves or conduit that extend through the assembly and allow drainage; size holes to accommodate movement. 3) Install a flashing collar or membrane patch lapped under the weather barrier and sealed to the roof or wall system. 4) Insert closed-cell backer rod to control sealant depth (depth ≈ half the joint width) and prevent three-sided adhesion. 5) Prime surfaces if required. 6) Tool a continuous bead of compatible sealant around the sleeve or bolt and over the flashing overlap. 7) Fit EPDM boots or prefabricated collars on round penetrations and clamp per instructions. 8) Install neoprene washers and torque fasteners to specification. 9) Allow full cure per manufacturer and test with a low-pressure water hose, observing interior for leaks.
Q: How do I repair existing leaks around sign penetrations without replacing the sign?
A: Isolate the problem by removing old sealant and cleaning to sound substrate; cut out cracked, loose or contaminated material. Inspect flashing, sleeves and fasteners; replace corroded bolts and washers with stainless steel and add sleeves or sleeves with integrated collars if the hole is oversized. Apply primer if required, insert new backer rod to control depth, and reseal with a compatible sealant. For complex failures use a peel-and-stick flashing patch sealed to the membrane or a custom EPDM boot glued and clamped around the penetration. After repairs, perform a water test and document the repair so future teams know what was done.
Q: What ongoing maintenance and inspection practices prevent future water intrusion around sign penetrations?
A: Inspect penetrations seasonally and after severe weather for cracked or detached sealant, degraded boots, loose fasteners, corrosion, and failed flashing laps. Reapply sealant every 3-7 years depending on product exposure and manufacturer guidance; replace boots or collars that show UV embrittlement. Keep records of sealant types, application dates and warranties. Maintain drainage and trim vegetation that traps moisture. If movement or repeated failures occur, evaluate redesign options such as sleeved conduit with drip edges, raised curbs, or relocating the penetration to a more favorable location.