
There’s a straightforward set of steps you should follow when installing a pylon sign to ensure structural integrity, code compliance and optimal visibility: assess site conditions and local zoning, obtain permits, design for wind and electrical loads, engineer and pour a reinforced foundation, coordinate electrical wiring and lighting, anchor the column per specifications, and schedule inspections. You should also plan for maintenance access and document compliance so your pylon remains safe, durable, and effective.
Key Takeaways:
- Conduct a site assessment and obtain permits: check zoning, set-backs, utility locations, and secure building/electrical permits before work begins.
- Design and engineer the foundation: perform soil testing and use an engineered footing with proper anchor bolts and embedment depth for local frost and load conditions.
- Specify structural materials and loads: select rated steel framing, corrosion protection, and design for applicable wind, snow, and seismic codes.
- Plan electrical and lighting systems: size power supply and conduit, install weatherproof junctions and LED drivers, and provide internal access for servicing.
- Follow safe installation and inspection procedures: use proper rigging and leveling, follow bolt-torque sequences, employ fall protection, and complete final inspections and maintenance planning.
Understanding Pylon Signs
You’ll encounter pylon signs from about 10-40 ft tall, mounted on one or two steel poles to achieve line-of-sight above landscaping; they often feature backlit acrylic faces, router-cut logos, and concrete footings of 1-2 yd³. You rely on them to communicate to motorists at 30-70 mph, where sight distance ranges 200-800 ft, and many retail parks use 20-30 ft pylons to list multiple tenants and improve wayfinding.
| Height | Typical 10-40 ft |
| Materials | Steel poles, aluminum cabinets, acrylic faces |
| Illumination | LED backlit or halo-lit, 25-60 W per face |
| Foundation | Concrete footer 1-2 yd³ with anchor bolts |
| Zoning | Varies by municipality; check setbacks/height limits |
Definition and Purpose
You use pylon signs primarily to boost identification distance and present multi-tenant information at roadway speeds, increasing recognition range up to three times versus low-mounted signs; they serve as landmark beacons for 200-800 ft sightlines and often replace building-mounted signage where visibility from a distance matters. Municipal code limits face area and height, so you’ll align design choices with permitting requirements and night visibility needs.
| Primary Purpose | Increase long-range visibility and wayfinding |
| Visibility Gain | Up to 3× vs low-mounted signs |
| Placement | 200-800 ft sightlines depending on speed |
| Content | Single brand or stacked multi-tenant panels |
| Permitting | Requires zoning check and often plan review |
Types of Pylon Signs
Types include single-pole pylons for highway exposure, double-pole frames for wider cabinets and wind resistance, multi-tenant stacked cabinets for shopping centers, monument-hybrid designs that lower profile near sidewalks, and digital LED pylons for programmable messaging; each type influences structural design, permitting, and cost ranges-roughly $4,000-$25,000 depending on size and electronics.
- Single-pole: 20-40 ft, optimized for highway visibility.
- Double-pole: wider cabinets, better wind load distribution.
- Multi-tenant: stacked panels listing several businesses.
- Monument hybrid: lower visual impact, better for pedestrian zones.
- This supports targeted promotions and rapid message updates.
| Single-pole | 20-40 ft; highway exposure |
| Double-pole | Wider faces; improved wind resistance |
| Multi-tenant | 10-30 ft; stacked panels for centers |
| Monument hybrid | Low profile; pedestrian-friendly |
| Digital LED | Programmable; higher electrical needs |
You’ll need to factor wind load calculations, soil bearing (commonly 1,500-3,000 psf), and electrical service when choosing a type; for example, a 25 ft LED pylon may require a 100 A circuit and a 4×4×4 ft concrete pier with engineered anchor design, and you should expect structural engineer-stamped plans for heights above local thresholds (often 15-20 ft).
- Wind loads: design per ASCE 7 or local code.
- Electrical: LED pylons often need 60-100 A service.
- Foundation: typical concrete pier 1-2 yd³ depending on soil.
- Cost factors: materials, height, illumination, and permitting.
- This affects long-term operating expenses and maintenance planning.
| Wind/Structural | Design per ASCE 7; engineer-stamped |
| Electrical | 60-100 A for LED systems |
| Foundation | Concrete pier 1-2 yd³ typical |
| Permitting | May require site plan and inspections |
| Lifecycle | LED saves energy; face replacement every 5-10 yrs |
Site Selection for Installation
Pick locations that satisfy municipal setbacks (often 10-25 ft), height caps (commonly 20-50 ft), and sign-face limits (100-300 sq ft in many commercial zones). Factor soil bearing-typical shallow foundations assume 1,500-4,000 psf-or plan for deep piers in soft sites. Position the pylon to avoid underground utilities and to meet visibility triangles; for example, moving a pylon 15 ft back can satisfy a 20 ft setback while improving driver sightlines on a 40 mph arterial.
Zoning Regulations
Obtain a sign permit with stamped structural drawings and a site plan showing setbacks and elevations; permit timelines usually run 2-8 weeks and fees range widely ($100-$1,000+). Expect limits on illumination intensity, hours of operation, and restrictions in historic or residential buffer zones. If your project exceeds size or height limits, submit a variance application with traffic and visual impact studies; many jurisdictions require a public hearing for variances.
Visibility Considerations
Optimize line-of-sight based on traffic speed and sight distance: use the 1 inch of letter height per 10 ft of viewing distance rule to size copy. Mounting height typically sits 14-20 ft for vehicle sightlines, with pedestrian clearance at 7-10 ft. Orient the sign perpendicular to predominant traffic flow, avoid placement behind mature landscaping, and plan for lighting that balances daytime contrast and nighttime glare control.
For more precision, run a legibility analysis: at 45-55 mph you should target 40-60 inch letters or larger, and perform mockup evaluations at the actual cue points (e.g., decision point 500 ft before an exit). Photometric modeling helps set LED brightness and shielding to meet lumen limits; a retail park saw a 30% increase in sign-read rates after increasing letter height to 48 inches and adjusting mounting angle by 10 degrees toward the roadway.
Design and Planning
Plan the sign around sightlines, branding hierarchy, and code limits so you can justify size, height, and illumination to permitting authorities. You should run visibility studies at typical approach speeds (35-55 mph) to set minimum letter heights and viewing distances (for example, 100-500 ft sightlines), and produce scaled elevations, structural assumptions, and a spec sheet showing materials, finishes, and electrical loads for permitting and bid accuracy.
Sign Dimensions
You’ll commonly specify sign faces from about 4×6 ft up to 12×20 ft depending on frontage; multi-tenant bays often use 3-8 ft tall panels stacked vertically. Many municipalities cap face area to roughly 100-200 sq ft per side and heights to 20-40 ft. Also factor pole diameter and spacing: 6-10 in poles for sub-20 ft signs, 12-18 in for taller pylons, and bottom-clearance of 8-15 ft for vehicle sight lines.
Material Choices
Choose structural steel for high-strength, cost-effective legs and aluminum for weight-sensitive, corrosion-resistant frames; specify hot-dip galvanizing or PVDF/powder-coat finishes. Face options include 1/8-1/4 in acrylic or 3-6 mm ACM for routed graphics, and polycarbonate for impact zones. Integrate LED modules (SMD, 3000-6000K) mounted to aluminum backers with IP65-IP67 drivers to manage heat and moisture.
For specific sites select materials accordingly: coastal locations benefit from 6061/6063 aluminum, 316 stainless fasteners, and Kynar/PVDF coatings; highway-facing pylons in high-wind areas should use welded 12-16 gauge steel with internal bracing and concrete footings sized per soil report (commonly 3-6 ft deep). Plan maintenance intervals-acrylic faces 8-12 years, LEDs rated 60,000-100,000 hours, and structural inspections every 3-5 years-and capture these specs in shop drawings.
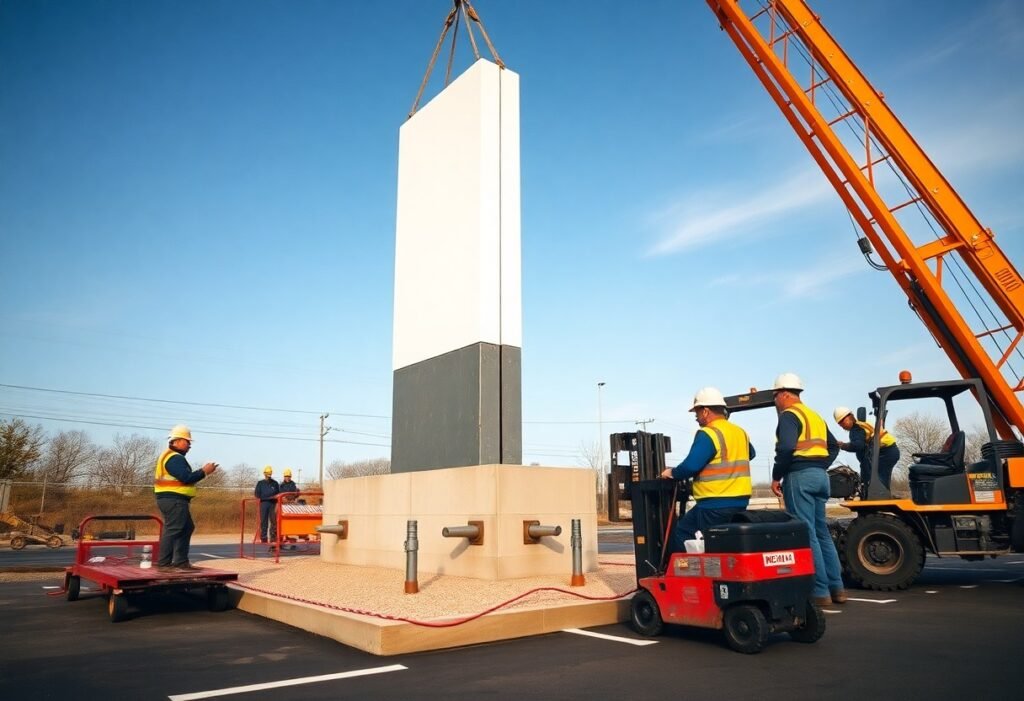
Installation Process
You coordinate foundation prep, pole erection, electrical hookup, and final inspection during installation. Typical foundations are 3-6 ft deep with 24-48 in diameter footings using 3,000-4,000 psi concrete; you should schedule municipal footing and final inspections. Work with a licensed electrician for 120/277V connections and plan about 7 days for initial concrete cure before subjecting the footing to full erection loads.
Preparation and Equipment
Before work starts, you call 811 for utility locating and secure permits. Bring excavation gear (mini-excavator/backhoe), a crane sized to sign weight (5-30 ton), rebar cages, anchor bolt kits (3/4-1 in diameter, 24-36 in embedment), torque wrenches, level/plumb devices, and PPE including harnesses; include a certified rigger for lifts over 1,500 lbs.
Step-by-Step Installation Guide
Start by staking the layout, locating utilities, and excavating to design depth. Install rebar and anchor bolts, pour 3,000-4,000 psi concrete and allow initial cure. Set poles with a crane, plumb and secure, mount the cabinet, complete NEC-compliant electrical, energize and test LEDs, then request final inspection and backfill.
Installation Steps Overview
| Site Prep | Stake layout, 811 utility locate, geotech check (if required) |
| Foundation | Excavate 3-6 ft, place rebar cage, pour 3,000-4,000 psi concrete |
| Pole & Sign Erection | Use crane (5-30 ton), set poles, align plumb, bolt cabinet |
| Electrical | Run conduit, bond/ground per NEC, connect LED drivers and test |
| Inspection & Closeout | Municipal footing and final inspections; document with photos |
When you implement the step-by-step sequence, verify soil-bearing capacity (typical 1,500-3,000 psf); increase footing size if soils are weak. Use taglines and a certified rigger during pole set; for signs weighing 1,500-3,000 lbs a 10-20 ton crane is common. Tighten anchor nuts to manufacturer torque, test LED drivers under load, and keep inspection records for permit closeout.
Step Details and Specs
| Footing Specs | 3-6 ft deep, 24-48 in diameter, 3,000-4,000 psi concrete; rebar cage per engineer |
| Anchor Bolts | 3/4-1 in diameter, 24-36 in embedment; set in template and checked for plumb |
| Pole Setting | Crane capacity by sign weight; use shims/plates to achieve ±1/8″ plumb |
| Electrical | 120/277V wiring, 3/4-1 in conduit typical, bonding/grounding to NEC, GFCI where required |
| Testing & Documentation | Power-on tests, photometric checks for illumination, photos and inspection reports for permits |
Maintenance and Upkeep
Set a maintenance cadence that fits your site exposure: high-traffic or coastal locations typically need checks every 3 months, inland sites every 6 months. During routine visits, you should inspect fasteners, LED modules, wiring, and the concrete foundation for 0.5-2 in. settlement. Keep a log with photos and torque readings, and replace weather seals and diffusers proactively-LED modules commonly reach 30,000-50,000 hours, so plan for staged replacements to avoid full-face downtime.
Regular Inspections
Schedule visual and hands-on inspections: verify anchor-bolt torque to manufacturer specs, test photocells and timers, and scan for corrosion on welds and flange plates. You should clean lenses on a 6-12 month cycle to maintain lumen output and perform insulation resistance tests annually. Use a 20-item checklist covering structural, electrical, and cosmetic items, and flag any items needing follow-up within 7-14 days to prevent escalation.
Repairing Damage
After impact, storm, or vandalism, first secure the site and erect barriers; then perform a structural assessment for bent poles, cracked bases, or compromised welds. You should engage a licensed sign contractor for any structural or electrical repairs and anticipate repair windows from same-day temporary fixes to 1-4 weeks for full restorations, depending on permit requirements and parts availability.
For more detail, document damage with measurements and NDT where needed-ultrasonic weld testing or concrete coring can reveal hidden failures. You should budget for common repair scopes: panel replacement ($200-$1,500), LED module swaps ($100-$800 per module), and foundation remediation ($3,000-$25,000). Obtain temporary power isolation certificates, secure permits for foundation or pole replacement, and schedule teardown/erection work during low-traffic hours to minimize business disruption.
Cost Considerations
You should plan for a broad cost range: simple single-sided pylon signs often run $5,000-$15,000, while large illuminated multi-tenant pylons commonly reach $30,000-$100,000+ once foundation, electrical and permits are included. Permits and engineering can add $200-$2,500, geotechnical borings $800-$2,500, and electrical hookups $500-$2,500. For a local example and contractor options see Pylon Sign Design and Installation in Humble TX.
Budgeting for Installation
Allocate your budget by line item: 40-50% fabrication/materials, 15-25% foundation/site prep, 10-15% electrical, 5-10% permits/engineering, and ~10% for installation labor. Include a 10-15% contingency for unforeseen soil or utility issues, and obtain at least three bids to compare scope and warranties; a typical 20-foot illuminated pylon often shows 2-4 bids within a $15,000 spread due to differing foundations and lighting specs.
Long-term Investment Analysis
Assess payback and ongoing costs: a 20-foot illuminated pylon that costs $40,000 delivering a $4,800 annual net revenue uplift yields an ~8.3-year simple payback. Factor in annual maintenance (often 1-3% of initial cost), occasional face updates, and energy costs when modeling ROI. You should track sales lift and leads pre/post-install to validate the sign’s performance.
Dig deeper by modeling operating costs: a 100W LED running 12 hours/day uses ~438 kWh/year (~$57 at $0.13/kWh), plus routine maintenance and periodic face replacements. Consider depreciation, financing vs cash purchase, and lease options; many businesses amortize signs over 5-7 years for internal ROI analyses, but consult your accountant for tax treatment and to refine your payback timeline.
Final Words
With this in mind, you should plan pylon sign installation by assessing site conditions, securing permits, hiring qualified installers, preparing appropriate foundations, integrating electrical and structural safety checks, and scheduling final inspections – this approach ensures your sign is durable, code-compliant, and effective at directing customers to your location.
FAQ
Q: What initial steps are required before installing a pylon sign?
A: Conduct a site survey to confirm property lines, sightlines, and clearances; check local zoning, sign codes and easements; obtain required permits; perform utility locates for underground services; and complete a geotechnical or soil report to inform foundation design.
Q: How is the foundation for a pylon sign designed and constructed?
A: Foundation design is based on soil conditions, sign height, wind and seismic loads and local frost depth. Typical construction uses reinforced concrete footings with embedded anchor bolts or anchor cages sized per structural engineering drawings. Follow concrete mix, curing times, reinforcement placement and inspection requirements; verify anchor alignment and torque before erecting the sign.
Q: What structural considerations influence pylon sign fabrication?
A: Structural factors include overall height, face area and wind/seismic loads; material selection (steel, aluminum) and corrosion protection (galvanizing, coatings); internal access for wiring and maintenance; welded vs. bolted connections; and engineered shop drawings stamped by a licensed structural engineer to meet code and load criteria.
Q: How are electrical and lighting systems installed and protected in a pylon sign?
A: Electrical work requires licensed electricians and permits. Use weatherproof junction boxes, conduit, and gaskets; specify LED modules or lamps with appropriate IP ratings; provide a secure service disconnect and circuit protection; include surge protection and a photo/astronomical timer or photocell for automatic control; label circuits and include access for future maintenance.
Q: What inspections and ongoing maintenance are needed after installation?
A: Obtain final inspections and sign-off from permitting authority and electrical inspector. Conduct a post-install structural check (anchor bolts, welds, plumbness), electrical continuity and grounding tests, and lamp/LED functionality. Establish a maintenance plan for cleaning, fastener checks, corrosion control, light module replacement and periodic structural re-inspections per manufacturer and engineer recommendations.