
Over time when you remove a sign, your patched area requires methodical repair: clean and sand the surface, apply a quality primer, match and mix paint to existing tones, feather multiple thin coats, and finish with an appropriate sealant; this process minimizes texture and color differences and delivers a durable, professional-looking result.
Key Takeaways:
- Assess substrate, remove loose material, clean with appropriate solvent, and treat any rust or corrosion.
- Sand and feather surrounding paint to create a smooth transition and mechanical key for new coatings.
- Apply a compatible primer (etching primer for bare metal), allowing proper flash and dry times before topcoat.
- Match color and apply multiple thin coats, feathering edges to blend rather than building heavy single layers.
- Finish with clearcoat if required, allow full cure, then wet-sand/polish as needed; use PPE and dispose of waste per local regulations.
Understanding Sign Removal Patch Paint
When you remove a sign, patch paint repairs typically address gouges up to 6 mm and feathered edges of 20-50 mm; you should plan for a primer (20-40 µm), body filler up to 2 mm, and a topcoat matched to original gloss and pigment. Expect 2K systems to achieve handle times in 30-60 minutes and full cure in 24-48 hours, with UV-stable topcoats resisting noticeable fade for 2-5 years depending on exposure.
Types of Patch Paint
You’ll choose among solvent-borne alkyds, waterborne acrylics, 2K polyurethanes, shellac-based primers, and epoxy primers; alkyds give gloss and flow, acrylics dry in ~20-40 minutes, 2K PU delivers chemical resistance with a 4-hour pot life, shellac blocks tannin bleed, and epoxies provide adhesion to oxidized metals.
- Alkyd enamel: good flow and gloss retention for metal signs.
- Acrylic waterborne: fast tack-free times, low VOCs, easy clean-up.
- 2K polyurethane: high abrasion and chemical resistance for high-traffic locations.
- Shellac primer: ideal for organic stains and tannin bleed on wood substrates.
- This touch-up pen or aerosol is best for spot repairs under 25 mm and precise color matching.
| Alkyd enamel | 12-24 hr full cure; good gloss; metal and wood |
| Acrylic (water) | 20-40 min tack-free; low VOC; quick recoats |
| 2K polyurethane | Pot life ~4 hr; chemical/UV resistant; high durability |
| Shellac primer | Blocks stains; fast dry; best for wood/tannin |
| Epoxy primer | Excellent adhesion to rusted steel; longer cure; substrate prep needed |
Importance of Proper Removal
If you leave residual adhesive, loose paint, or grease, adhesion failures jump-field studies show delamination rates rising from ~1-2% to 12-18% on poorly prepped panels; you should use 80-120 grit for heavy corrosion, feather to 50 mm, and verify adhesion with a cross-hatch test (ISO 2409 grades 0-2 acceptable for most signage).
Proper removal reduces callbacks and lifecycle costs: one municipal signage contractor cut repaint frequency from every 18 months to 5 years by standardizing solvent wipe, 2-step sanding (80 grit then 320 grit feather), and a 2K primer/topcoat system, saving roughly 30-40% annually. You should log substrate, cleaning solvent, and ambient conditions (temperature 10-30°C, humidity <70%) to ensure consistent cure and warranty compliance.
Tools and Materials Needed
You’ll need abrasives, fillers, primers, paints, masking supplies, and safety gear; typical kits include 80-400 grit discs, 2K body filler, and a 2K urethane clearcoat. Use a dedicated solvent and a rust converter for corroded areas, and consider aerosol touch-up for <1 sq ft repairs. For technique guidance and paint-transfer removal tips, consult A Professional Detailer’s Guide to Removing Paint Transfer ….
Essential Tools
You should have a dual-action sander (5″ pads), sanding blocks, 80-320 and 400-600 grit media, a mixing board, spreaders, and a spray gun or quality aerosols. Include a respirator (P3), nitrile gloves, LED inspection light, and a dust extractor for indoor work. Professionals also carry a temperature/humidity gauge because paint adhesion and cure depend on 15-25°C and <60% RH conditions.
Recommended Paints and Primers
Choose an epoxy or zinc-rich primer for bare steel, a self-etching primer for aluminum, and a sandable filler primer for feathered edges. For topcoat use a 2K urethane basecoat/clearcoat system; expect tack-free times of 10-30 minutes and handling cure in 24-72 hours. Match OEM color with a spectrometer or OEM code for accurate blending.
In practice, use products like PPG DP90 or SEM epoxy on bare metal, SEM 39073 for aluminum, and Duplicolor or 2K filler primers for feather-sanding. Mix 2K primers and clears per manufacturer ratios (commonly 4:1 base:hardener), note pot life of 1-4 hours, and aim for wet-film builds of 40-60 µm per coat to achieve durable coverage and blendable edges.
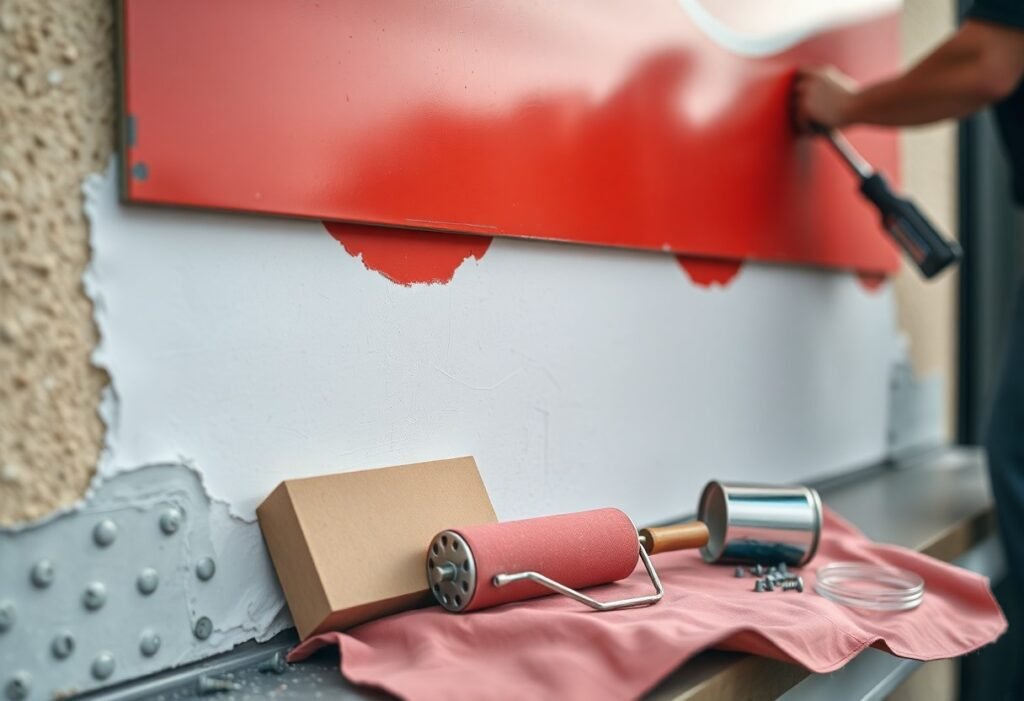
Preparing the Surface
Before you paint, prepare the patch by sanding and cleaning: feather edges with 180-320 grit, remove loose material, and degrease with isopropyl alcohol or mineral spirits. Treat steel rust with a phosphoric rust converter, then prime-use an etching primer for aluminum or a 2K epoxy primer for steel. Allow primers to flash 15-30 minutes and follow manufacturer cure times before final sand and topcoat.
Cleaning and Repairing the Area
You can use a heat gun (100-200°C on low) or adhesive remover to lift old vinyl or glue, then scrape with a plastic blade to avoid substrate gouging. For deeper damage apply a two-part epoxy or polyester filler, shape with 80-120 grit and finish to 220-320 grit. Let filler cure per product instructions (typically 20-60 minutes) before priming.
Assessing the Damage
You should inspect substrate type, coating adhesion, and damage depth: measure pits or gouges with calipers-over 1 mm depth normally needs filler or panel replacement. If 25-30% of the sign surface shows delamination, plan for full-area prep and recoat. Note corrosion around fasteners and any backing failure that compromises structural integrity.
As you map damage, use raking light and tape to outline zones and photograph for records; this helps estimate materials and labor. For metal signs, use a magnet to distinguish steel from aluminum; for plastics, flex tests reveal hairline cracks. In one municipal job where 40% of a panel delaminated, crews opted to strip and recoat the whole unit to avoid repeat repairs.
Techniques for Effective Patch Painting
When you paint a patch, control layer thickness and cure times: apply 2-3 thin coats targeting 25-75 microns DFT per coat, sanding lightly between coats with 400-600 grit. Work at 10-30°C and under 70% humidity to avoid fish-eyes and orange peel. For a 6 mm gouge with a 20-50 mm feather, extend your paint overlap 50-150 mm to reduce a visible halo, and use a compatible primer or adhesion promoter matched to the substrate (zinc phosphate for steel, epoxy primer for corrosion-prone areas).
Application Methods
You should choose method by patch size: brush or synthetic-bristle touch-up for <25 cm², 4-6 mm nap foam roller for irregular panels, and HVLP spray for seamless blends on larger areas. For HVLP use a 1.0-1.3 mm nozzle at ~8-12 psi at the cap, thin 5-10% with manufacturer reducer, and overlap passes by ~50%. Always build multiple thin coats rather than one heavy coat and allow 10-30 minutes flash between coats for most waterborne acrylics.
Blending with Surrounding Areas
You must feather outward and visually merge edges: sand the feathered perimeter to 400-600 grit, spray the final color in progressively lighter passes extending 50-150 mm beyond the repair, and finish with a transitional clearcoat to even gloss. Use a spectrophotometer or a small test panel to confirm color match under daylight; mismatches often show as metamerism under different light sources.
For finer finishing, wet-sand the cured clear with 1000-2000 grit to remove any edge lines, then machine-polish using a 3-step approach (cut, polish, finish) at 1,500-2,500 rpm. You should check gloss and color in diffuse daylight and under directional light to catch holograms or mottling, and if needed perform a localized reblend rather than stripping the entire panel.
Curing and Finishing Touches
After patching, control temperature and humidity to ensure predictable cure: aim for 20-25°C (68-77°F) and 40-60% RH. You should let small acrylic repairs go tack-free in 30-60 minutes and reach handle strength in 2-4 hours; plan full mechanical cure of about 7 days before heavy use. Use 1-3 thin coats to avoid runs and keep total dry film thickness under 150 µm for best adhesion.
Drying Times
You can expect waterborne patch paints to go tack-free in 30-60 minutes at 20°C, become sandable after 2-4 hours, and fully cure in roughly 7 days. For two‑component polyurethanes expect handling in 4-6 hours and full cure in 24-72 hours; baking at 60°C for 30 minutes speeds this. Higher humidity or temps below 10°C will substantially extend these times.
Final Coat Application
When you apply the final coat, use thin, even passes-spray 1-2 full wet coats or brush/roll one uniform coat-targeting 40-60 µm (1.6-2.4 mil) DFT per coat. You should overlap each pass by 10-15% and feather out 20-30 mm beyond the repair. Follow the product recoat window, typically 10-30 minutes for fast-flash systems or 4-24 hours for conventional finishes.
Before the final coat you should scuff-sand with 400-600 grit and wipe with a solvent-approved tack cloth; if you miss the recoat window, wet-sand with 800-1000 grit. For 2K clears many systems use a 4:1 mix with a pot life of about 2-4 hours at 20°C, so plan mixing and application accordingly. Work in cross-coats to reduce orange peel and finish with a light detail coat for consistent gloss and edge blend.
Maintenance and Long-Term Care
After the patch cures, schedule routine checks every 6-12 months: wash with a mild detergent, inspect seams and edges, and log conditions with photos. If the sign faces direct sun or salt air, plan to reapply a UV-resistant topcoat every 3-5 years (2-3 mil dry film recommended). You should also perform an adhesion check after severe weather events and address any rust or substrate movement within 30 days to prevent delamination.
Protective Measures
To extend patch life, apply a 2K polyurethane clear coat or fluoropolymer finish for high-UV exposure, and seal edges with a flexible silicone or elastomeric caulk to block moisture. You can add a sacrificial UV film (for example, 3M UV protective films) on high-traffic faces and install a small overhang or drip edge to reduce direct rainfall and grime buildup.
Recognizing Wear and Tear
Inspect for common failure modes: flaking, chalking, color fade, hairline cracking, and edge lift. You should note chalking intensity, measure color shift (Delta E >3 is often visible), and perform a simple cross-cut adhesion test (ASTM D3359); ratings below 3B indicate action is needed. Photograph defects and compare over time to track progression.
In practice, coastal installations often need touch-ups every 12-18 months; for example, a municipal wayfinding sign showed 8% edge delamination after one winter and was repaired before 20% area loss. If a pull-off adhesion test reads under ~1.0 MPa or cross-cut is <3B, schedule localized sanding, primer spot treatment, and recoat within 2 weeks to prevent spreading. Maintain a log with dates, test results, and materials used for warranty and future planning.
Conclusion
Conclusively, after removing a sign you should clean and sand the patch, feather the edges, apply a compatible primer, and match your topcoat color precisely; use thin, overlapping passes to blend paint and finish with a protective clear coat, allow proper curing time, and inspect for texture or color inconsistencies so you can correct them before reopening the area to traffic or exposure.
FAQ
Q: How should I prepare the surface after removing a sign so the patch paint adheres properly?
A: Remove all mounting hardware and scrape away adhesive and cured caulk with a plastic scraper or putty knife. For stubborn adhesive use heat (heat gun) or a solvent compatible with the substrate (citrus-based or isopropyl alcohol for many paints; mineral spirits or adhesive removers for tougher residues). Degrease with a mild detergent, rinse with clean water, and allow to dry fully. Sand glossy or weathered edges to a feathered profile so the patch transitions smoothly into surrounding paint-start with 80-120 grit for leveling, finish with 180-220 grit. If substrate shows damage (dents, gouges, rust, rot), repair with metal filler, wood epoxy, or masonry patch before priming. Use PPE and ventilate when using heat or solvents.
Q: How do I match color and sheen when repainting a sign removal patch?
A: Take a clean, uncontaminated sample of the existing paint (a scrap or a shaved chip) to a paint store for spectrophotometer matching, or bring a high-resolution photo only if a sample isn’t available. Expect weathering and UV fade; match to the aged appearance by slightly muting new mixes or doing a test panel and letting it weather briefly outdoors. Match sheen (flat, satin, semi-gloss) because sheen differences are more noticeable than small color mismatches. Apply test patches in the intended light conditions and view from several angles before committing to full application.
Q: What primer should I use for different substrates after sign removal?
A: Choose primer by substrate: use rust-inhibiting or etch primer for bare ferrous metal; zinc-rich or epoxy primers for severe corrosion protection; bonding primer or oil-based primer for glossy painted metal; exterior-grade acrylic or latex primer for wood and drywall; masonry primer or a masonry sealer for concrete and stucco; shellac or stain-blocking primers for tannin-bleeding woods or after removing old oil-based finishes. For mixed surfaces, select a high-adhesion universal primer. Follow manufacturer flash and dry times, and sand lightly between primer coats if required to achieve a smooth base.
Q: What techniques make a patch blend seamlessly into the surrounding surface?
A: Feather the edges of the existing paint by sanding until the transition is nearly imperceptible. Use thin, multiple coats of paint rather than one heavy coat-apply with a brush for small patches, a short-nap roller for textured finishes, or spray for the smoothest blend. Match surface texture: stipple with brush or roller to imitate orange-peel, or skim-coat and sand for smooth walls. Slightly overlap the adjacent paint and work outward in diminishing strokes. After the final coat cures, use a light polishing or scuff-sand and apply a compatible clear coat to equalize sheen if needed.
Q: What finishing steps, maintenance, and safety/disposal considerations apply after patch painting?
A: Allow full cure time before subjecting the area to stress or cleaning-follow the paint and primer technical data. If the location is prone to vandalism, consider an anti-graffiti clear coat that allows later solvent or pressure-wash removal. Clean the area with mild detergent; avoid aggressive abrasives that strip the patch. Dispose of solvent-soaked rags, used paint, and leftover solvents per local hazardous-waste regulations-store and transport them in sealed containers. Reinspect seasonally for adhesion, cracking, fading, or reappearance of adhesive residue and touch up as needed. For large or complex substrates, structural damage, or color-critical matches, hire a professional painter or sign-restoration specialist.