
Letters exposed to weather demand precise sealing, material selection, and installation techniques to keep water out; you ensure waterproof channel letters by choosing corrosion-resistant metals and marine-grade silicone gaskets, sealing seams with continuous beads, providing internal drainage and weep holes, protecting LED housings with conformal coating, and verifying integrity with pressure or spray testing before and after installation. Use certified mounting hardware and follow manufacturer torque and overlap specifications to maintain long-term watertight performance.
Key Takeaways:
- Choose IP-rated components: use IP65-IP68 LED modules, watertight connectors, and a back box rated for outdoor exposure (NEMA 3R or higher).
- Seal all seams and face joints with a continuous bead of neutral-cure exterior silicone or automotive-grade sealant; weld or properly crimp seams where possible.
- Protect electronics by potting LED connections with silicone or epoxy or by using IP68-rated modules; house power supplies in a weatherproof enclosure with appropriate venting and desiccant.
- Use waterproof cable glands, grommets, and gasketed fasteners; seal screw holes and feed-throughs with silicone and corrosion-resistant washers.
- Validate and maintain seals: perform spray/immersion tests, inspect periodically, replace degraded sealant, and provide controlled breathing or drainage to limit condensation.
Understanding Waterproof Channel Letters
Definition and Importance
You rely on IP-rated sealing and durable housings to prevent water intrusion; waterproof channel letters combine IP65-IP68 LED modules, NEMA 3R or 4-rated back boxes, and silicone or polyurethane gaskets to block moisture, protect wiring and drivers, and ensure lighting that runs 10-16 hours daily stays reliable for 50,000+ LED hours.
Common Applications
You commonly find waterproof channel letters on storefronts, gas stations, hospitals, marinas, transit hubs and rooftop IDs; specifications often call for IP67+, UV-stabilized acrylic faces, marine-grade metals near coasts, and vapor-resistant seals at fueling sites to meet safety and durability requirements.
When you outfit a coastal retail or QSR chain with 316 stainless returns, IP68 LED modules, sealed cable glands and a polyurethane topcoat, service visits can fall from quarterly to annual, cutting maintenance costs by roughly 60% and extending finish life beyond five years-a frequent ROI example in seaside deployments.
Materials Used in Waterproof Channel Letters
You select materials based on exposure, LED type, and budget: common choices are aluminum or stainless steel housings, polycarbonate or acrylic faces, and sealed silicone gaskets for joins. Aluminum returns at 0.040″-0.063″ (1-1.6 mm) give strength without weight, while polycarbonate faces (3-10 mm) resist impact. For maintenance guidance, consult Ways to Care for and Preserve Your Channel Letter Sign to extend life and waterproofing performance.
Waterproof Plastics
Polycarbonate is your go-to when impact resistance and thermal stability matter: it tolerates roughly −40°C to 120°C and is used at 3-10 mm thicknesses for faces; acrylic (PMMA) gives superior optical clarity and better UV resistance but is more brittle. You typically solvent-weld or use closed-cell silicone gaskets at cut edges to maintain IP65+ sealing, and consider UV-stable grades or coatings for multi-year outdoor exposure.
Corrosion-Resistant Metals
Aluminum alloys (5052, 6061) are standard for returns and backs, usually 0.040″-0.063″ (1-1.6 mm) to balance rigidity and weight; anodized or powder-coated finishes add moisture and UV protection. Stainless steel grades 304 suit urban installs, while 316 is recommended for coastal sites where chloride corrosion is a concern; choose finishes and fasteners to match expected environmental severity.
In corrosive environments you should pair materials and fasteners carefully: use 316 stainless hardware with 316 panels or anodized aluminum and isolate dissimilar metals with nylon washers to avoid galvanic action. Apply passivation or marine-grade coatings and seal seams with neutral-cure silicone (2-3 mm beads). Expect maintenance cycles-every 6-12 months in high-salt areas-and plan for coatings or replacement to achieve 5-10+ years of reliable service.
Design Considerations for Waterproof Channel Letters
When planning waterproof channel letters, specify durable materials and serviceability: use die‑cast or 1.0-1.2 mm aluminum returns, stainless‑steel (316) fasteners, continuous welds or polyurethane seam seal, and a NEMA 3R back enclosure with accessible service panel. You should size gaskets for ~1.5-2 mm compression and allow 10-20 mm clearance for potting or wire routing; designing for routine access simplifies resealing and reduces long‑term ingress risk.
Sealing Techniques
You can combine mechanical and chemical seals: factory weld seams and then bead neutral‑cure silicone or polyurethane along joins, use EPDM or silicone compression gaskets at the face-to-return interface, and pot LED modules with silicone gel or epoxy where vibration or direct water exposure occurs. Use IP68-rated cable glands and soldered, heat‑shrinked joints inside the back box to maintain continuity of the waterproof barrier.
Drainage and Ventilation
You should provide controlled drainage and vapor escape: place 3-5 mm weep holes at the lowest points, spaced roughly 300-600 mm (12-24 in), and incorporate breathable vents (e.g., PTFE/Gore vents) to equalize pressure without admitting spray. Also slope internal mounting surfaces 1-2° toward drains and include replaceable desiccant packs to limit condensation after temperature swings.
Install vents opposite the weep holes to promote airflow while keeping openings small and sheltered; use recessed or hooded weeps to prevent direct rain entry in wind‑driven conditions. In coastal or industrial locations, increase maintenance frequency to every 6-12 months, replace desiccant annually, and consider corrosion‑resistant coatings or additional potting around vulnerable electronics to extend service life.
Installation Best Practices
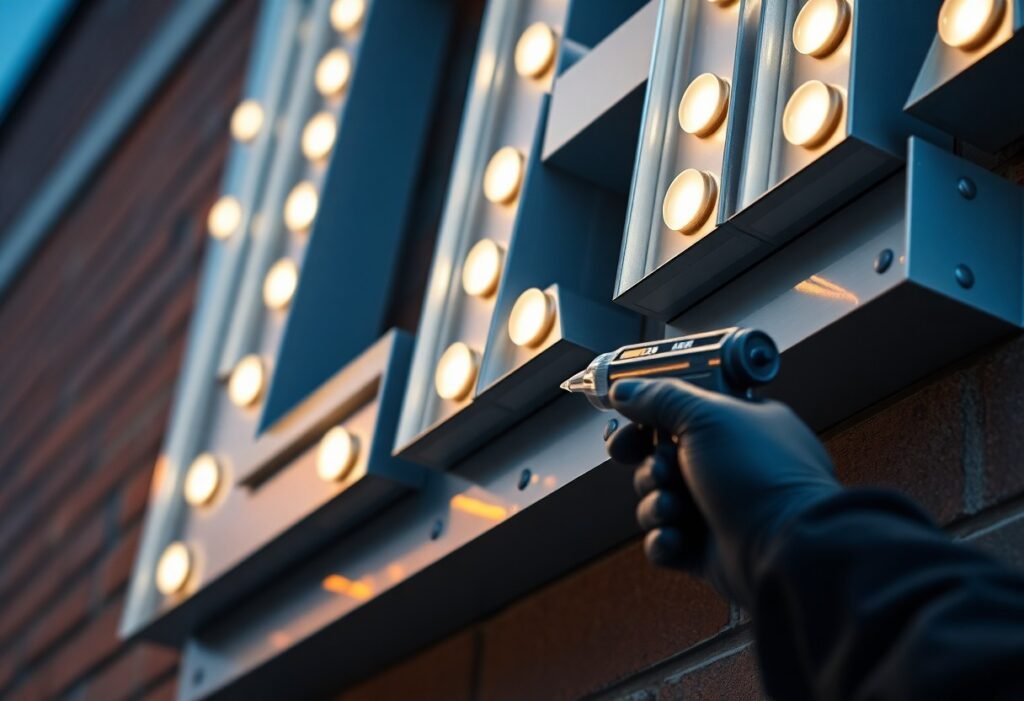
During installation, follow the engineered template and site survey data so your letters align, load onto the substrate correctly, and maintain electrical routing into the back box; use a NEMA 3R or better backbox and route conduit through gasketed knockouts. Position letters to avoid direct runoff paths, test junctions with a 5-10 minute hose test at ~50 psi after sealing, and document fastener types and sealant batch numbers for future maintenance.
Surface Preparation
Thorough surface preparation ensures durable seals: strip loose paint and debris, degrease with 70% isopropyl alcohol, and prime porous substrates (concrete/brick) with a compatible primer. Confirm flatness within ~3 mm over 1 m to prevent stress on seals, pre-drill to manufacturer hole diameters, and use chemical anchors or sleeve anchors sized to the substrate and sign weight for secure load transfer.
Securing Water-Resistant Features
Anchor points, cable glands, and joints require IP-rated hardware: install IP68 cable glands at every entry, use neoprene or EPDM washers under heads, and choose marine-grade 316 stainless steel fasteners to resist corrosion. Apply a continuous seal at the housing-to-backbox interface and maintain a 3-6 mm sealant bead; verify gland torque to manufacturer spec so threads compress the gasket without over-tightening.
For extra protection, use a neutral-cure silicone (e.g., Dow Corning 795 or equivalent) or polysulfide sealant applied as a continuous 3-6 mm bead with 10 mm overlap onto existing paint or primer; allow 24-48 hours cure before water testing. Add 3M VHB tape as secondary adhesion (press 30 seconds, full cure 72 hours) and fit Gore vents on large letters to equalize pressure while preserving waterproofing, then perform a final hose test at ~50-60 psi for 5-10 minutes to confirm no ingress.
Maintenance of Waterproof Channel Letters
You should treat maintenance as a scheduled preventive program: inspect and clean channel letters every 3-6 months and increase to monthly for coastal or high-pollution sites. Use a moisture meter, torque driver, and magnifier to detect seal failures, corrosion, or loose fasteners early. Keep a photographed log of each unit and note trends in ingress or LED failures so you can plan gasket or sealant replacement before full water damage occurs.
Routine Inspections
Perform visual and functional checks quarterly (monthly in harsh environments), verifying gasket compression, sealant beads, back‑box drainage, cable glands, and mounting hardware torque. Open a representative 10% sample of letters to inspect for condensation, corrosion on LED boards/drivers, and compromised connectors. Inspect immediately after storms; visible fogging, pooled water, or intermittent LEDs signals a leak that requires resealing or component replacement.
Cleaning Methods
When cleaning, power down and use a pH‑neutral detergent with a soft microfiber cloth or non‑abrasive sponge; rinse with fresh water and dry to avoid streaking. Avoid solvents like acetone or MEK, ammonia cleaners, and abrasive pads that craze acrylic or strip paint. Keep pressure washing under ~500 psi and the nozzle at least 1 m (3 ft) away. Clean every 3-6 months, moving to monthly in coastal locations.
Follow a safe, repeatable procedure: lock out power, test‑clean a small area, then soak heavy deposits (bird droppings, salt) for 5-10 minutes with mild detergent before gentle agitation and rinsing. Replace cracked faces or compressed gaskets, reseal joints with marine‑grade 100% silicone or polyurethane sealant, and apply dielectric grease to external connectors to help maintain the IP rating.
Troubleshooting Common Issues
When moisture problems arise, work systematically: isolate power, document symptoms, and inspect seams, grommets, and backs for visible water or corrosion. You should prioritize signs that indicate active ingress – condensation inside the acrylic, rust on fasteners, or intermittent LEDs – and use a multimeter, moisture meter, or borescope to map the affected zones before attempting repairs to avoid repeated failures.
Identifying Water Damage
Fogging between the face and trim cap, green/white deposits on copper traces, and LEDs that drop brightness or flicker are classic indicators of water intrusion; after heavy storms check your letters within 48 hours. You can often trace entry to seam gaps (≥0.5 mm), failed grommets, or damaged IP-rated connectors, so target those areas first during your inspection.
Repair Solutions
Start by powering down and drying the cavity with desiccant packs or a 60°C heat gun on low, then clean contacts with 90%+ isopropyl alcohol. You should replace compromised LED modules and connectors with IP65-IP68 rated parts, swap corroded fasteners for 316 stainless steel, and reseal seams using a neutral-cure silicone like Dow Corning 791 for outdoor glazing.
For a durable fix, remove the face to access all seams, then abrade and clean mating surfaces before applying a 6-8 mm continuous bead of neutral-cure silicone; allow 24-48 hours for full cure. Replace any grommets or cable glands showing compression set, torque enclosure screws evenly to maintain uniform compression, and retest with a moisture meter or 24-hour water spray test to confirm the seal holds under simulated weather.
Summing up
Following this, you ensure waterproof channel letters by specifying IP-rated fixtures and LEDs, sealing seams and face returns with industrial-grade silicone or gaskets, potting LED modules and wire connections, providing drain paths and weep holes, using corrosion-resistant fasteners and UV-stable adhesives, and pressure-testing assemblies before installation; you also implement proper flashing and mount details, and schedule periodic inspections to maintain the seal and prevent water ingress.
FAQ
Q: What defines a waterproof channel letter and which IP rating should I target?
A: A waterproof channel letter is constructed and sealed to prevent moisture, dust, and contaminants from reaching internal LEDs, drivers, and wiring. Target an IP rating appropriate for the environment: IP65 is a good baseline for outdoor signs exposed to rain and spray; IP66 offers stronger protection against powerful water jets; IP67 suits temporary immersion or very wet conditions. Also consider NEMA ratings and local code/UL requirements. Choose materials and assembly methods that meet the chosen IP rating and allow for thermal management and service access.
Q: How do you seal seams, faces, and joints to keep water out?
A: Use continuous seam welding for metal housings or chemically bonded seams for plastics, followed by a compatible primer and finish. Install EPDM or silicone gaskets between face and returns and use a neutral-cure silicone sealant on exterior seams where welding isn’t possible. Overlap and shingle joints to shed water, and design lips or drip edges to prevent capillary action. For illuminated faces, ensure the face-to-return interface has a continuous compression gasket and mechanical fasteners with neoprene washers, then seal screw heads externally with RTV or small caps.
Q: What protections do LEDs, drivers, and wiring need inside a waterproof channel letter?
A: Use IP-rated LED modules and drivers, mount drivers in sealed compartments or a sealed remote enclosure, and pot critical connections with silicone or epoxy potting compounds where applicable. Wire entries must use IP-rated cable glands or molded grommets with strain relief, and all exposed terminations should have heat-shrink tubing and conformal coating. Provide a breathable membrane vent (Gore vent) to equalize pressure and prevent condensation without admitting water, and locate drivers where heat can dissipate while remaining protected.
Q: Which installation and mounting practices reduce water ingress risk?
A: Seal all wall penetrations with exterior-grade sealant and use flashing or drip edges above mounts. Mounting studs should have neoprene washers and be sealed at both the sign and wall interfaces; avoid through-holes that allow direct water paths into the cabinet. Angle tops slightly or include weep/drain channels so water cannot pool. If a backbox is used, ensure it has an IP-rated access panel with a compression gasket and consider a small screened breather to prevent moisture buildup while keeping insects out.
Q: How should waterproof channel letters be tested and maintained after installation?
A: Perform an initial water test such as a controlled hose test (per IP guidance) and inspect for leaks and condensation. Check seals, gaskets, screw heads, and cable glands periodically-tighten fasteners and reapply neutral-cure silicone where sealant has degraded. Inspect for corrosion, paint failure, or mechanical damage and replace compromised components. Test internal electronics: verify driver temperatures, LED output, and insulation resistance periodically. Keep documentation of materials and service intervals to guide future repairs and maintain the intended waterproof rating.