
With proper planning and adherence to safety protocols, you should always de-energize circuits, use lockout/tagout procedures, and wear appropriate PPE; ensure the installation is performed or inspected by a licensed electrician, obtain permits, follow local codes, secure mounts and weatherproof connections, use tested tools and GFCI protection, and verify grounding and clearances before energizing the sign. Conduct post-installation testing and schedule required inspections to protect yourself and others.
Key Takeaways:
- Perform a site risk assessment, identify nearby utilities, obtain required permits, and plan safe access and hoisting.
- De-energize circuits and apply lockout/tagout procedures before touching wiring or components.
- Use appropriate PPE (arc-rated clothing, insulated gloves, eye protection) and insulated tools; employ fall protection for work at heights.
- Securely mount signs with proper supports, corrosion-resistant hardware, and compliance with wind and load ratings.
- Follow local electrical codes: correct wiring, grounding, weatherproofing, GFCI protection where needed, and final testing or sign-off by a licensed electrician.
Understanding Electrical Signs
You’ll need to differentiate power sources, enclosure ratings, and mounting methods to manage installation hazards. Many signs use low-voltage LED drivers (12-48 V) or line-voltage supplies (120-480 V); LED modules commonly exceed 50,000 hours and can use 50-80% less energy than neon. NEC Article 600 and local electrical codes govern sign wiring, so verify label data, IP ratings (often IP65 for outdoor fixtures), and manufacturer service access before finalizing the install plan.
Types of Electrical Signs
You’ll encounter channel letters, cabinet (box) signs, pylon/freestanding signs, neon tubing, and large-format digital LED displays, each demanding different electrical and structural considerations. Channel letters house LED modules and drivers, neon needs high-voltage transformers and specialized glass handling, and digital displays require high current, heat management, and data/control wiring; plan wiring runs, surge protection, and service access accordingly.
- Inspect conductor insulation, driver enclosures, and potting for moisture intrusion.
- Match driver ratings, fusing, and surge arrestors to nameplate currents and ambient temperatures.
- Confirm anchor systems meet wind-load calculations and coordinate with structural engineers for rooftop mounts.
- Assume that you will perform lockout/tagout, verify zero energy state, and use appropriate PPE before working on any sign circuitry.
| Channel letters | LED modules, internal drivers, modular replacements, low maintenance |
| Cabinet signs | Backlit fluorescent or LED strips, weather-sealed housings, accessible service panels |
| Pylon / freestanding | Concrete foundations, conduit risers, remote lighting and metering |
| Neon tubing | High-voltage transformers, fragile glass, specialist installation and repair |
| Digital LED displays | High power draw, thermal management, data/control cabling and redundancy |
Common Applications
You’ll install signs on storefronts, shopping centers, gas stations, freeway billboards, and building facades, each with differing access, permitting, and electrical service needs. For instance, a typical multi-channel retail façade may require multiple 20-30 A circuits, photo controls for night shutoff, and planned maintenance every 3-5 years to clean lenses and verify seals and grounding.
When you prepare municipal or highway projects, coordinate meter locations, service drops, and disconnects with the utility and permitting authority; many jurisdictions require labeled disconnects, load calculations submitted with plans, and anti-arc/ground-fault protection for large or illuminated installations to pass inspection.
Safety Regulations and Standards
You must navigate overlapping codes and local rules: NEC (NFPA 70) governs electrical sign installations, OSHA requires fall protection for work above 6 ft and safe access, UL listings (UL 48/1598/8750) cover sign and luminaire safety, and building departments often demand permits, inspections, and stamped structural drawings; for example, FAA notification is required for structures over 200 feet AGL and utilities normally require service agreements before connection.
National Electrical Code (NEC)
NEC Article 600 specifically addresses signs – wiring methods, disconnects, clearances and lighting circuits – while general NEC rules apply elsewhere: size conductors and overcurrent protection to account for continuous loads at 125%, follow grounding and bonding per NEC 250, provide listed equipment and accessible disconnects, and comply with conductor ampacity and overcurrent device coordination requirements.
Industry-Specific Guidelines
Depending on location and use, you must meet additional standards: UL 48 listing for electric signs, NEC classified‑location requirements (Article 500) at fuel sites, FAA Part 77 review near airports, and many municipalities require engineer‑stamped structural calculations, anchor details, and specific inspection checklists before approval.
For practical compliance, you install explosion‑rated junction boxes and sealed conduits at fuel stations, submit FAA notice for any sign or structure exceeding 200 feet AGL, and produce ASCE 7 wind‑load calculations plus anchor embedment and proof‑load testing for rooftop signs; coordinate metering and point‑of‑attachment with the utility and retain inspection records per local retention periods (commonly 3-5 years).
Risk Assessment in Installation
Before you begin, perform a structured site risk assessment: map overhead lines and buried utilities, measure working heights and fall exposure, verify sign electrical class (common circuits are 120 V, 277 V or 480 V), and confirm hoisting and wind-load limits per local code and ASCE 7; call 811 before any digging. Use the placement checklist in Where to Place Electrical Safety Signs in Factories … to align signage with access and hazard controls.
Identifying Hazards
Survey the site for energized conductors, potential arc-flash sources, unstable attachment points, vehicular traffic, and weather exposure; keep at least 10 ft clearance from many overhead lines under 50 kV per OSHA guidance, and locate transformers or junction boxes that might force adjacent work to remain live. Also call out confined-space entries, combustible materials within 10-25 ft, and fall exposures over OSHA thresholds so you can tag and control each hazard before work starts.
Analyzing Potential Risks
Use a simple 1-5 likelihood and 1-5 severity matrix to score each hazard and prioritize mitigations-treat scores above 8 as high priority. Base likelihood on site history, traffic counts, wind zone, and equipment condition; quantify severity by potential outcomes such as electrocution, a fall from height, or structural failure to focus controls where they reduce the greatest risk.
For high-scoring risks, specify controls: de-energize and apply lockout/tagout where feasible, perform an NFPA 70E arc-flash analysis and assign appropriate arc-rated PPE, engineer and certify mountings and guying for wind loads, use rated rigging with a minimum documented safety factor, install temporary barriers and traffic control, and require a competent person to sign off on residual risk-documenting this lets you defend mitigation choices and provides a clear action plan if conditions change.
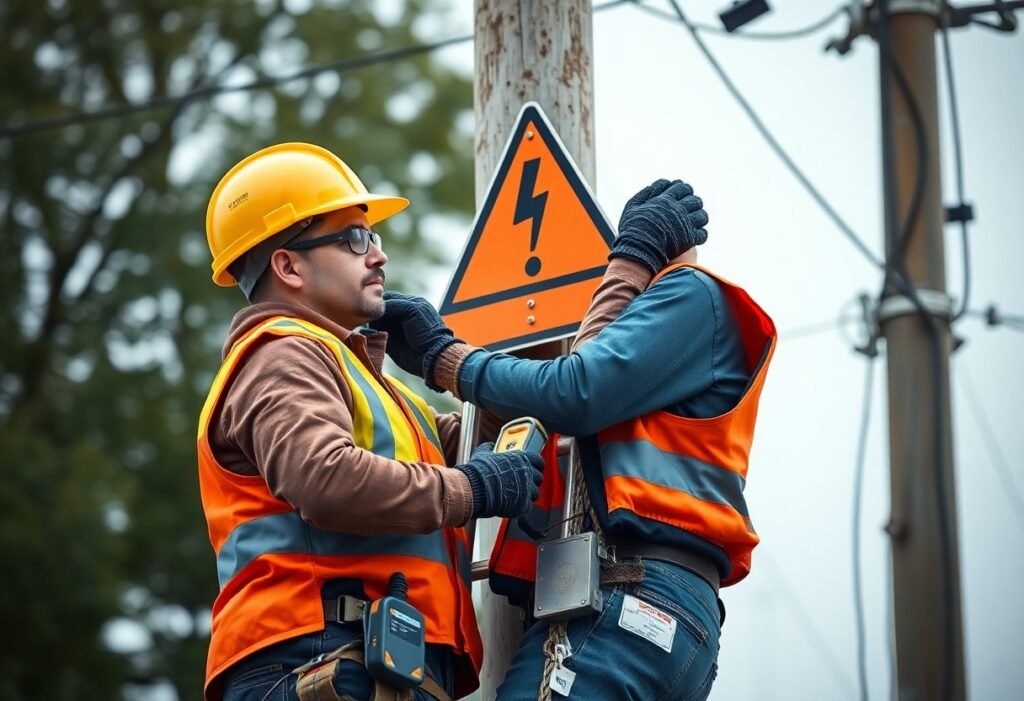
Essential Personal Protective Equipment (PPE)
You must outfit your crew with certified PPE: hard hats (ANSI Z89.1), voltage-rated insulating gloves (ASTM D120, Class 0-4), impact-rated eye protection (ANSI Z87.1), high-visibility garments (ANSI/ISEA 107), and full-body harnesses tied to 5,000 lb anchorage points for fall protection; selecting the right combination reduces contact, arc flash, and fall risk while meeting regulatory benchmarks on job sites and inspections.
Types of PPE Required
Identify PPE by task and exposure: use Class-rated gloves for live work, Type II hard hats for overhead risk, and eye shields for arc flash or particulate hazards; match hi‑vis level to day/night roadside installs and confirm harness compatibility with your anchor system.
- Hard hats – Type I/II based on lateral impact exposure.
- Voltage-rated gloves – Class 0-4 for nominal voltages up to 36 kV; wear leather protectors over insulators.
- Eye/face protection – Z87.1-rated goggles or full-face shields for arc flashes.
- High-visibility clothing – ANSI/ISEA 107 class selection by roadway speed and lighting.
- Perceiving the worksite hazards lets you pair glove class, helmet type, and harness to the exact exposure.
| Hard hat | ANSI Z89.1 Type II for overhead/side impact |
| Insulating gloves | ASTM D120; Class 0 (≤1 kV) to Class 4 (≤36 kV) |
| Eye protection | ANSI Z87.1 safety glasses or face shield for arc flash |
| Hi‑vis garments | ANSI/ISEA 107 classes based on traffic and lighting |
| Fall protection | Full-body harness, shock-absorbing lanyard, anchor ≥5,000 lb |
Proper Usage of PPE
You must inspect PPE before each shift for cuts, cracks, or dielectric degradation, verify expiration/date stamps on insulating gloves, and ensure helmets and harnesses fit snugly-a loose harness invalidates fall clearance calculations; retire any item after an impact or as the manufacturer’s schedule dictates, and log inspections for compliance audits.
Train your team on correct donning/doffing sequences and storage: keep insulating gloves in UV‑protected bags, use leather protectors over electrical gloves, and perform dielectric testing per manufacturer-commonly every 6-12 months depending on use. Calibrate eye and face protection to arc‑flash PPE categories, and calculate fall‑clearance distances accounting for free‑fall, deceleration, and worker height; after any fall arrest, remove the harness from service and have a competent person evaluate rescue plans and equipment before returning to work.
Installation Procedures
When you move into installation, align your hoisting and access methods with the site risk assessment, verify permits are current, and confirm utility locates within 48 hours; then de-energize circuits, set lockout/tagout, and stage lifts so the sign never exceeds rated sling angles or a single-point load above the mount’s 1.5:1 safety factor.
Preparation and Planning
You should verify sign weight and wind load (example: a 2.5 m² LED panel at 45 kg with 120 km/h gust rating), confirm supply voltage (120/240 V, breaker size), order anchors (M12 stainless, 10 kN rated), plan two-person lifts, arrange a certified lift plan and rescue plan, and pre-test LEDs on the bench for 4 hours.
Step-by-Step Installation Guidelines
You must perform pre-install checks (mount alignment, anchor pattern), install mounts torqued to spec (for example, 90 Nm for M12), route conduit and pull conductors rated for wet locations, make connections with IP67 junctions, hoist using rated slings, verify sign level and torque, energize under supervision, then run a 60-minute functional test and record results.
Preparation & Planning Checklist
| Task | Details |
|---|---|
| Site assessment | Confirm clearances, overheads, and 2.5 m pedestrian setback |
| Permits & locates | Obtain permits; call utility locate 48 hrs prior |
| Load calculations | Check sign weight, wind load, and mount capacity (1.5:1 factor) |
| Equipment | Hoist rated for sign weight + 25% reserve; M12 anchors |
| PPE | Class III harnesses, 1.2 m shock-absorbing lanyards, helmets |
| Electrical prep | Confirm breaker size, supply type, and conduit run lengths |
You should follow a methodical sequence: complete lockout/tagout, attach temporary tag and test grounding, install and torque mounts to manufacturer spec (e.g., 90 Nm for M12), run wiring with labeled conductors, use heat-shrink and IP67 connectors, hoist with a minimum two-person certified crew, then perform a documented 60-minute commissioning with insulation and continuity readings.
Step-by-Step Installation
| Step | Action / Notes |
|---|---|
| Pre-checks | Verify drawings, bolt pattern, weight, and permit conditions |
| Lockout / LOTO | Isolate supply; place tags and test absence of voltage |
| Mount installation | Drill anchors, set M12 studs, torque to spec (e.g., 90 Nm) |
| Electrical prep | Run conduit, pull labeled conductors, install junction boxes |
| Wiring | Make IP67 connections, seal entries with silicone within 24 hrs |
| Hoisting | Use rated slings, keep sling angle ≥ 60°; two-person minimum |
| Commissioning | Restore power, perform 60-min functional test, measure currents |
| Documentation | Record torque values, test readings, photos, and sign-off |
Maintenance and Inspection
During the service life of a sign, set a planned inspection cadence: visual checks monthly, functional and electrical tests quarterly, and full documentation and thermal imaging annually. You should follow manufacturer intervals and NEC/NFPA guidance while tracking findings in a maintenance log. Pay attention to moisture ingress at seals, LED driver heat-sink temperatures, and any color shift or flicker as early failure indicators. Use lockout/tagout before opening enclosures and photograph defects for trend analysis.
Routine Maintenance Practices
Inspect and clean lenses and gaskets every 3-6 months using non-abrasive cleaners; replace degraded gaskets to maintain IP ratings. You should torque cabinet fasteners to manufacturer specs-typically 20-40 in‑lb for small hardware-and apply dielectric grease to exposed terminals. Test grounding continuity (<25 Ω preferred), verify ballast/driver output current within ±5% of spec, and maintain spare driver and LED modules on site to reduce downtime.
Inspection Checklists
Use a standardized checklist that covers: mounting integrity, lens condition, seal/gasket status, wiring insulation, terminal torque, grounding resistance, overcurrent device ratings, and light output (lux). You should include tests such as insulation resistance (megger ≥1 MΩ for circuits), polarity checks, and functional run tests under load to confirm driver stability. Log serial numbers and photo evidence for warranty claims.
Drill down by assigning pass/fail criteria and acceptable ranges-e.g., insulation resistance ≥1 MΩ, ground resistance <25 Ω, driver output current within ±5%, and no hotspot >10°C above ambient on thermal scans. You should timestamp and index each item, track repairs with corrective-action codes, and perform trending analysis quarterly; a retail chain reduced sign failures 40% after adopting this method.
Summing up
With this in mind you should always de-energize circuits, verify power is off, and follow local electrical codes when installing signs. Wear appropriate PPE, use rated tools, secure mounts and weatherproof connections, and perform insulation and grounding checks. Test functionality and labeling, obtain permits if required, and involve a licensed electrician for complex or high-voltage work to protect your safety and compliance.
FAQ
Q: What pre-installation checks and planning should you do before installing an electrical sign?
A: Start by conducting a site survey to locate existing utilities, assess mounting surfaces, and verify structural support and wind/load ratings. Check local electrical and signage codes, obtain permits, and confirm available power capacity and circuit protection at the service panel. Coordinate with the utility if work is near primary lines, create a wiring diagram and parts list, and plan for weatherproofing, conduit runs, and access for future maintenance.
Q: What personal protective equipment (PPE) and tools are required for safe installation?
A: Use PPE rated for electrical work: arc-rated clothing when there is an arc-flash hazard, dielectric gloves with leather protectors, safety glasses, hard hat, non-conductive footwear, and fall-arrest gear for elevated work. Use insulated hand tools, a calibrated voltage tester or multimeter, lockout/tagout devices, torque wrenches for termination torque, and appropriate lifting equipment such as a rated lift or bucket truck. Ensure all tools and PPE are inspected and certified for the task.
Q: How should electrical isolation and lockout/tagout be performed during sign installation?
A: De-energize the circuit at the source, apply lockout/tagout per OSHA or local regulations, and post clear signage indicating the work in progress. Verify the absence of voltage using a reliable tester on known live source first (proof test), then test the actual conductors, and, if required, apply temporary grounding for exposed conductors. Only qualified personnel should remove locks after verifying the installation and ensuring all tools and personnel clear the work area.
Q: What safety measures apply when working at heights or using ladders and lifts?
A: Use engineered fall-protection solutions: full-body harness, shock-absorbing lanyard or self-retracting lifeline, and certified anchor points. Inspect ladders and lifts before use, maintain three points of contact on ladders, use a qualified operator for aerial lifts, and keep the work zone clear of bystanders. Maintain safe clearance from overhead power lines, de-energize lines if the work encroaches on minimum approach distances, and avoid elevated work in high winds or electrical storms.
Q: What testing, commissioning, and maintenance steps ensure a safe, long-term installation?
A: After installation, perform continuity, polarity, insulation resistance (megger) and ground-bond tests, and verify proper circuit protection and GFCI/RCD operation where required. Tighten and torque all electrical connections, label circuits and disconnects, and create as-built documentation including photos and wiring diagrams. Establish a scheduled inspection and maintenance program (visual, thermal imaging, cleaning, and fastener checks), train personnel on emergency shutdown and troubleshooting, and keep records of inspections and repairs.