
You can modernize your fluorescent sign by replacing tubes with LED retrofit kits or high-efficiency LED strips, choosing color temperature and brightness to match branding. Inspect the signbox, remove old ballast or use ballast-compatible lamps, confirm voltage and wiring, secure proper heat dissipation and IP-rated fixtures, and mount LEDs with even spacing. Test for uniform illumination, seal the enclosure, and verify compliance with local electrical codes to ensure a durable, low-maintenance conversion.
Key Takeaways:
- Assess sign and existing fixtures: lamp type (T5/T8/T12), ballast presence, dimensions, diffusion, and power availability.
- Choose the right LED solution: ballast‑compatible tubes, ballast‑bypass (direct‑wire) tubes, or full LED retrofit modules/strip kits with appropriate lumens, CCT, CRI, and IP rating.
- Follow proper installation steps: disconnect power, remove fluorescent tubes and ballast if required, install LED modules or tubes per manufacturer wiring (bypass ballast if specified), secure wiring and fixtures.
- Meet electrical safety and code: use UL/ETL‑listed components, correct driver and wire gauge, adequate fusing, and consider a licensed electrician for rewiring or driver changes.
- Handle disposal and testing: recycle fluorescent lamps, verify dimming and thermal performance, and expect substantial energy and maintenance savings.
Understanding Fluorescent Signage
Fluorescent signage in channel letters and lightboxes usually combines T5/T8/T12 tubes, a ballast (magnetic or electronic), reflectors, and a diffuser; you should note lamp lengths, mounting space, and whether the sign is 120V or 277V. Typical installations use 1-4 lamps per module, so you’ll measure depth and service access before deciding on retrofit strips, LED modules, or tube swaps. Existing optics and heat buildup will affect LED choice and placement during conversion.
Basics of Fluorescent Lighting
Tubes are sized by diameter-T5 (5/8″), T8 (1″), T12 (1.5″)-with common wattages like 14-54W for T5 and 32W for standard T8 (≈2,800 lm/lamp). Ballasts can be magnetic (hum, ~60 Hz) or electronic (instant/rapid/programmed start), and starting method affects lamp life (7,000-20,000 hours). Your CRI is often 60-85 and lumen depreciation typically reduces output 20-30% after 10,000-15,000 hours.
Common Issues with Fluorescent Signs
Flicker, ballast failures, color shift, mercury disposal, and uneven illumination are frequent problems you’ll face; ballasts often fail in 3-10 years, causing intermittent starts or silence, and frequent on/off cycling accelerates lamp wear. You’ll also see decreased lumen output and colder color temperatures over time, which makes signs look dim or patchy compared with newer LED options.
When converting, decide between ballast-compatible (Type A), ballast-bypass (Type B), or hybrid (A+B) LED tubes-each affects rewiring, safety, and UL compliance. You’ll typically cut energy use 50-70% (for example, replacing 4×32W fluorescent + ballast loss ≈140W with 4×12W LEDs ≈48W saves ≈92W), improve lifespan to ~50,000+ hours, and eliminate mercury disposal issues, but you must verify dimming compatibility and local electrical codes before rewiring.
Benefits of LED Signs
You’ll notice immediate operational and visual advantages when you convert: LEDs deliver brighter, more uniform illumination while cutting energy use and maintenance cycles. Expect 50-70% lower electrical consumption versus fluorescent fixtures, sharper color rendering for brand visibility, and fewer outages that disrupt business hours. Many operators report payback within 1-3 years from lower utility bills and reduced servicing, making the upgrade both a performance and financial win.
Energy Efficiency
You can cut energy use dramatically by switching to LEDs: typical LED sign modules achieve 80-150 lm/W compared with 50-90 lm/W for fluorescent tubes, translating to roughly 50-70% savings on lighting energy. That also trims HVAC loads from reduced heat output. For example, converting a medium storefront sign often drops annual consumption from ~2,500 kWh to under 1,000 kWh, shortening ROI to about 1-3 years depending on local rates.
Longevity and Durability
You’ll benefit from vastly longer lifespans: LED modules commonly last 50,000-100,000 hours versus ~8,000-15,000 hours for fluorescents, so your sign runs years longer without lamp swaps. That reduces ladder work, lamp inventory, and downtime, and keeps branding consistently lit for longer stretches between service visits.
You should also weigh ruggedness and warranty differences: many LED sign kits carry IP65 or higher ingress protection, shock-resistant housings, and 3-10 year warranties. In practice, retail chains that converted reported maintenance cost reductions of 60-80% over three years, and you’ll likely see fewer water- or vibration-related failures thanks to sealed modules and solid-state components.
Tools Required for Conversion
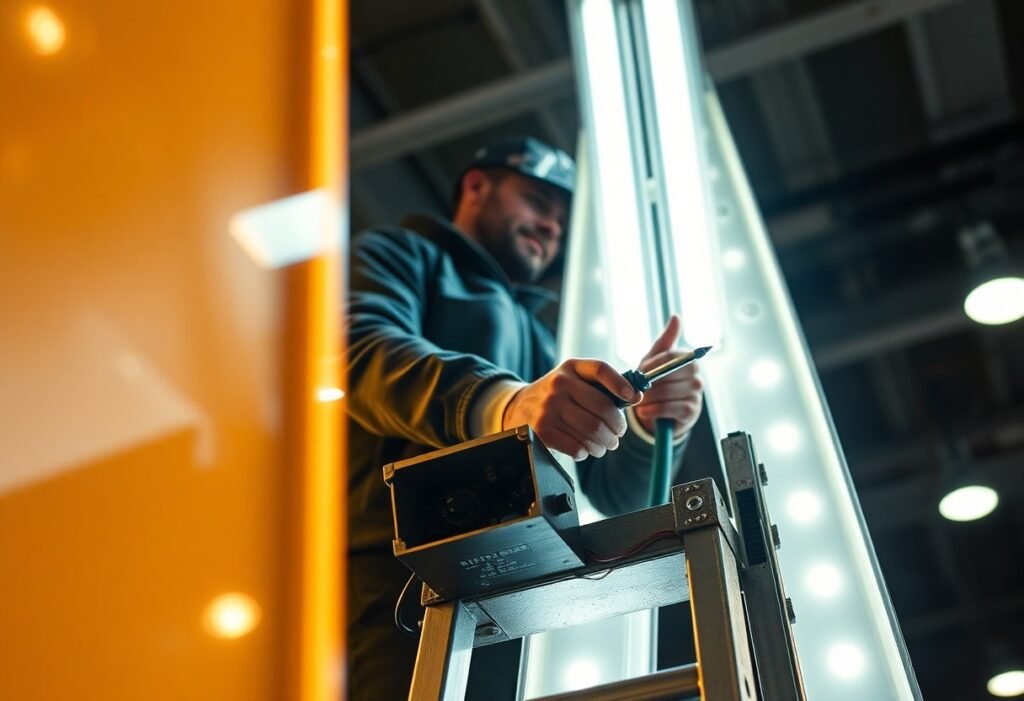
As you prepare to convert fluorescent signs, assemble a kit: true‑RMS multimeter (600V range), non‑contact voltage tester, insulated screwdrivers and pliers, wire strippers/crimpers, soldering iron and heat‑shrink, drill with metal bits, rivet gun and stainless fasteners, silicone sealant and weatherproof connectors (IP67), aluminum extrusion or channels for heat dissipation, LED drivers (12V/24V or constant‑current), spare LED bars/strips, measuring tape, and a stable ladder or lift rated for the job.
Essential Tools and Materials
You’ll select LEDs and drivers to match your sign: common choices are 12V 3528/5050 strips (4-14 W/ft) or rigid 1ft/2ft bars, plus aluminum channels for thermal management. Calculate driver size by summing module watts and adding ~20% headroom (example: 10 ft × 4.8 W/ft = 48 W → use a 60 W driver). Include IP65-IP67 connectors for outdoor boxes and UV‑stable diffuser film when replacing fluorescent tubes.
Safety Equipment Considerations
You must use proper PPE and work‑control devices: insulated gloves and tools, safety glasses or face shield, non‑contact voltage tester and multimeter, and a GFCI‑protected power source. Implement lockout/tagout at the breaker and have a rated ladder or aerial lift; for rooftop or elevated installs, use a fall‑arrest harness per local regulations. Test circuits twice before touching wiring.
For added detail, choose insulated gloves rated for the voltages you’ll encounter (Class 0 for typical 120-240 V work), and use UL/CE‑listed insulated hand tools. Verify non‑contact tester sensitivity and confirm with a multimeter. When removing old ballasts note that units manufactured before 1978 may contain PCBs and require hazardous‑waste disposal; always de‑energize and label breakers, and use a 3‑point harness or aerial lift for work above 6 ft.
Step-by-Step Conversion Process
Start by mapping the sign: note lamp type, ballast model, internal dimensions and target lumen output; then power down and test circuits. For detailed wiring options and ballast vs. ballast‑bypass guidance consult How to Convert Fluorescent Lighting to LED: A Quick and …. Typical outcomes: a 4×4ft T8 bank (4×32W = 128W) often converts to ~72W LED tubes or a 60-90W LED strip/driver setup, yielding 40-50% energy savings and longer service life.
Conversion overview
| Step | Details & tips |
|---|---|
| 1. Assess | Identify T5/T8/T12, ballast type (magnetic/electronic), measure cavity depth and diffuser transmittance; photograph wiring. |
| 2. Power off & test | Shut breaker, verify zero volts with a true‑RMS meter; allow 5-10 min for capacitors to discharge before touching ballast. |
| 3. Disassemble | Remove face/diffuser, tubes and ballast; label wires and note screw sizes and rivet types for reassembly. |
| 4. Select LED solution | Choose ballast‑bypass tubes, ballast‑compatible tubes, or 12/24V LED strips + driver; size driver for 25-30% overhead. |
| 5. Install | Mount aluminum channels or LED holders, wire constant‑voltage driver or direct‑wire tubes, secure thermal path to maintain L70 life. |
| 6. Test & finish | Measure lux/uniformity, verify no flicker, seal edges with silicone, reattach face and clean diffuser for best output. |
Disassembling the Fluorescent Sign
You should kill power at the breaker, remove the face and diffuser, then extract tubes and ballast using a Phillips #2 and nut driver; photograph wiring and record ballast part numbers (e.g., instant start vs. rapid start) for replacement decisions. Typical disassembly for a 4×4ft box takes 20-40 minutes; keep fasteners and rubber grommets labeled so your reassembly matches original mounting points.
Installing LED Fixtures
You can mount aluminum LED channels with rivets or thermal tape, place 2835 or 5060 strips spaced to avoid hotspots, and choose a constant‑voltage 12/24V driver sized 25-30% above strip wattage (for a 3m run at 14W/m choose a 60W driver). For retrofit tubes, either bypass the ballast and wire line to the tube end or install ballast‑compatible LED tubes per manufacturer wiring diagrams.
Go deeper by separating power options: use constant‑current drivers for high‑power COB modules and constant‑voltage drivers for strips; if you bypass the ballast, fit an inline fuse and use 14-16 AWG for runs over 2-3 m to limit voltage drop. Ensure aluminum channels provide ≥1.5× the strip length for heat dissipation; target 100-150 lm/W LEDs and test for uniformity with a lux meter-aim for ±15% variation across the face.
Wiring and Electrical Considerations
When you rewire a fluorescent sign for LEDs, plan for driver type, input voltage, and conductor runs: most retrofit drivers accept 120-277VAC and output 12V or 24V DC (or constant‑current 350-700mA). Calculate total wattage, allow a 20% margin, and account for inrush and power factor. For outdoor or long runs use higher-voltage or 24V systems to reduce voltage drop and select UL‑listed drivers and IP‑rated connectors for safety and longevity.
Understanding Electrical Requirements
You should measure existing supply voltage and total LED load: add up LEDs’ watt/ft (eg. 5W/ft × 10ft = 50W) and choose a driver ~60W. Decide between constant‑voltage (12/24V) for strips or constant‑current (350-700mA) for module arrays; constant‑current simplifies current sharing for series strings. Check driver specs for inrush current and temperature derating-many derate above 40°C by 10-20%.
Ensuring Proper Connections
You must use correct gauge and terminations: choose AWG based on current and run length (typical 16-14 AWG for most 12-24V sign runs), crimp ferrules on stranded conductors, and employ IP65‑rated quick‑connects outdoors. Secure neutral and hot splices with UL‑listed wire nuts or barrier terminals, torque screws to manufacturer specs, and always maintain a dedicated earth ground to the metal sign enclosure.
In practice, strip 6-8 mm of insulation, crimp ferrules with a proper tool, and place heat‑shrink over solder joints for strain relief. Install an inline fuse sized at ~1.25× the expected LED current near the driver output, verify polarity with a multimeter, and perform an insulation and continuity test before sealing the sign to prevent field failures.
Testing and Final Touches
Finish the conversion by methodically testing and refining the install: run the sign at full and reduced brightness to verify power supply sizing (choose a PSU rated ~20-30% above your measured load), inspect all solder joints and connectors for heat, seal seams with silicone for weather protection, and evaluate diffusion with the acrylic in place; check the sign at night from typical viewing distances to spot hotspots, color shifts, or bleed-through.
Testing the LED Setup
Power the system with the intended 12V or 24V supply and use a multimeter to confirm voltage and per-run current-typical strips draw 1-5 A per meter depending on 3528/5050/high‑output modules. You should cycle each channel for 24-48 hours to detect flicker or failed diodes, verify dimming across 0-100% for PWM compatibility, and confirm connectors and polarity under load to avoid thermal or voltage drop issues.
Making Aesthetic Adjustments
Adjust diffuser spacing, strip density, and internal finishes to remove banding: upgrade to 60-120 LEDs/m for even fill in 50-150 mm deep faces, choose frosted acrylic 3-5 mm to soften dots, and paint internal surfaces matte black to improve contrast. You should pick color temperature to match brand intent (3000K warm, 5000K daylight), and balance RGB channels to prevent color casts at mid and low dim levels.
When your channel letters exceed 150 mm depth, run multiple parallel LED runs or use high‑output SMD 2835/5050 modules to keep lux uniform; for example, a storefront conversion that switched to 120 LEDs/m 5050 strips with a 4 mm frosted face increased measured lux at 3 m from ~180 to ~420 and eliminated striping. You should use aluminum backplates for heat dissipation, specify CRI ≥80 for color accuracy, choose IP65‑rated strips or potting for outdoors, and set PWM dimming above 1 kHz to avoid visible or camera-detected flicker.
Summing up
With these considerations you can plan a safe, efficient conversion: assess your sign structure and dimensions, choose appropriate LED modules or tubes, decide ballast-compatible or ballast-bypass drivers, ensure correct driver voltage and thermal management, update mounting and wiring, verify color temperature, brightness and control compatibility, dispose of fluorescent components properly, and test for weatherproofing and code compliance. Professional installation is recommended for high-voltage or structural work.
FAQ
Q: What does converting a fluorescent sign to LED involve?
A: Converting replaces fluorescent tubes, ballast, and sometimes the fixture’s wiring and diffuser with LED light sources and an LED driver. The process typically includes removing tubes and ballast, assessing the fixture for corrosion or water ingress, selecting compatible LED modules or retrofit tubes, installing a driver or wiring for direct AC-compatible LED tubes, adjusting the sign face or diffuser for even light distribution, and testing for correct operation and brightness uniformity.
Q: What tools and materials are needed for the conversion?
A: Common tools: multimeter, insulated screwdrivers, wire strippers, crimping tool, heat gun or shrink tubing, and mounting hardware. Materials: LED retrofit tubes or LED strips/modules, appropriate LED driver (constant current or AC-compatible as required), wire nuts or connectors, wire of correct gauge, insulating materials, new diffuser film or backing if needed, and sealant for outdoor signs. Use components rated for sign use and weather if the sign is exterior.
Q: How do you handle the ballast and wiring-should it be removed or bypassed?
A: Options depend on LED type: for ballast-compatible (plug-and-play) LED tubes, you can leave the ballast but confirm compatibility with the ballast type and expected lifespan reduction. For direct-wire LED tubes or LED modules, remove or bypass the ballast and rewire the fixture to supply the correct input to the LED driver or tube (often line and neutral to single-ended or double-ended configurations). Always switch power off at the breaker, verify with a multimeter, label original wiring, follow the LED manufacturer wiring diagram, secure connections with rated connectors, and install an appropriate fuse or breaker if required by code.
Q: Which LED options are best for retrofitting signs-tubes, strips, or custom modules?
A: Choose based on size, uniformity, and access. LED tubes are simplest for fixtures built around linear lamps and minimal rework. LED strips or rigid modules offer higher control of light placement and better diffusion for deep signs or large faces. COB LED modules provide excellent uniformity for compact spaces. Consider driver location, thermal management, ingress protection for outdoor use, and whether dimming or color control is needed. Prioritize UL-listed or equivalent sign-rated products for safety and longevity.
Q: What safety, thermal, and regulatory issues should I watch for during and after conversion?
A: Turn power off and lock out before work. Ensure drivers and LEDs are mounted to surfaces that dissipate heat; overheating shortens life. Use wiring and connectors rated for sign temperature range and environment. Maintain proper grounding and follow local electrical codes; some jurisdictions require licensed electricians for sign wiring. For outdoor signs, seal openings and use IP-rated components. After conversion, verify polarity, check for flicker, measure operating current and temperature, and document changes for future maintenance. Dispose of removed fluorescent tubes and ballast according to local hazardous-waste rules.