
Installation of channel letters starts with your site survey and permitting; you then create accurate templates, plan secure mounting and electrical routing, run conduit and transformers to code, fasten letters with anchors or track systems, seal seams against moisture, and complete illumination testing and final inspection to ensure safe, even lighting and long-term durability.
Key Takeaways:
- Conduct site survey and obtain permits: measure mounting surface, check structure and electrical access, confirm local code requirements.
- Finalize design and fabricate letters: approve artwork, build returns and faces, install LED modules and wiring harnesses in shop.
- Plan mounting and power layout: choose raceway or stud-mount method, locate conduits, transformers or drivers, and prepare templates.
- Install hardware and mount letters: attach raceway/backer or anchor studs, secure each letter, route and secure wiring through conduits.
- Power up, test, seal, and inspect: verify electrical connections and lighting, seal seams and penetrations for weatherproofing, complete final inspection and cleanup.
Understanding Channel Letters
Definition and Types
In practice, channel letters are three-dimensional metal or acrylic characters you mount to a façade or raceway; common types include front-lit, back-lit (halo), combination, push-through, and neon-style. Standard depths range 3-12 inches, LEDs typically last 50,000+ hours, and you’ll choose style based on viewing distance, brand aesthetics, and mounting constraints.
- Front-lit: LED face for maximum nighttime visibility.
- Back-lit (halo): creates an ambient glow for premium branding.
- Combination: mixes front and halo for high contrast at night.
- Push-through: acrylic logo panels pushed through metal returns for vibrant color.
- Recognizing which type suits your storefront depends on setback, code restrictions, and desired visual impact.
| Type | Best use / Notes |
|---|---|
| Front-lit | High visibility; LED modules, visible from several hundred feet |
| Back-lit (halo) | Elegant, soft glow; requires 3-6″ setback from mounting surface |
| Combination | Maximizes legibility and style; higher component cost |
| Push-through | Bold colors; common for logos, uses thicker acrylic faces |
Benefits of Channel Letters
You gain 24/7 visibility and strong brand presence: LEDs offer 50,000+ hours and can cut energy use up to 60% versus neon, front-lit letters are readable from several hundred feet, and one retailer reported a 15% bump in evening foot traffic after an illuminated retrofit.
Operationally, channel letters deliver measurable ROI-many high-traffic locations recoup install costs in 12-24 months depending on hours lit and conversion lift. You’ll plan for routine cleaning every 6-12 months, LED module replacement every 5-10 years, and permit drawings that show mount method; common materials are aluminum returns and 3/16″-1/4″ acrylic faces, with raceway or stud mounting chosen for ease of service.
Planning the Installation
Before you schedule crews, finalize shop drawings, measure the façade to the nearest 1/8″ and confirm material choices-aluminum returns, polycarbonate faces, or reverse-lit acrylic. Factor in module sizes (most LED modules are 12″ centers), power runs, and a 2-6 week permit lead time. Consult The Basics in Building and Installing Channel Letters for fabrication-to-field tips and assembly sequences used by experienced installers.
Site Assessment
Survey the mounting surface and document substrate type (masonry, EIFS, metal stud), flatness tolerance, and exact mounting heights to 1/8″. Locate structural members for anchor placement, verify conduit chase and nearest disconnect, and calculate load: many LED runs draw 0.5-2 A per linear foot. Also map sightlines and obstructions; for example, signs over 10 ft wide often need additional wind bracing or a continuous backer channel.
Permits and Regulations
Apply for both a sign permit and an electrical permit early; municipal reviews commonly take 2-6 weeks and fees typically range from $50-$500. Check zoning for maximum sign area, setback limits, and historic-district overlays, and ensure compliance with NEC for outdoor wiring. You should include scaled elevations and illumination specs with your application to reduce revision cycles.
You should expect to submit a permitting packet with scaled elevations, a site plan showing setbacks and conduit routing, anchorage details, and an electrical diagram. Larger signs or those penetrating primary structure usually require stamped structural calculations from a licensed engineer and proof of contractor licensing and insurance; jurisdictions such as parts of California or Chicago often add 1-3 weeks for review if revisions are requested.
Tools and Materials Needed
Before you begin mounting, gather the specific tools and materials so you don’t stop mid-job; you’ll need power and hand tools, safety equipment, wiring components, mounting hardware sized to your letters, and weatherproof sealants. For instance, a 12V LED channel-letter run often requires 14-18 AWG wiring, a 60-120W driver depending on total wattage, M6/M8 studs for returns, and outdoor-grade silicone with UV resistance.
Essential Tools
You should carry a cordless hammer drill (capable of 18-24V) with masonry bits (3/16″-1/2″), hole saws for conduit penetrations, a rivet gun, crimpers, soldering iron, multimeter, and fish tape for wiring runs. Also bring scaffolding or an articulating boom for heights, an aluminum straight-edge level, heat gun, and safety gear (Class III harness if above 6 ft). On a 30-letter storefront, a brushless drill and good scaffolding typically cut install time by 25-40%.
Required Materials
You’ll need channel-letter components: aluminum returns, acrylic or polycarbonate faces, gasket materials, and stainless-steel studs or anchors sized to substrate (M6-M10 common). For illumination select LEDs (SMD 2835/3528 or high-density strips), drivers (12V or 24V, with 20% headroom), 14-18 AWG wire, waterproof connectors, and silicone sealant rated to IP65 or higher.
For selection specifics, choose LED density based on face size-typically 60-120 LEDs/meter for even front-lit coverage-and match driver wattage to the total LED load plus 20-30% buffer to avoid overheating. Use marine-grade 316 stainless studs in coastal installs, apply primer on painted surfaces, and pick acrylic thickness (3-6 mm) according to letter size and wind-load calculations to prevent flexing.
Preparing for Installation
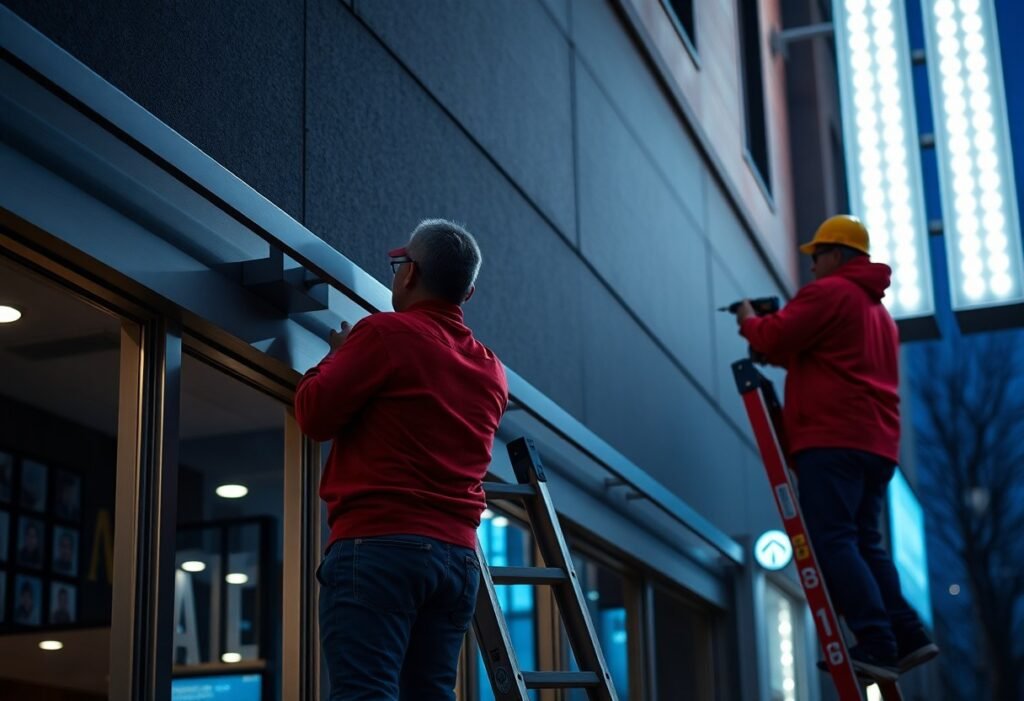
Before lifting letters, verify site access, permits, and weather windows and secure a boom lift or scaffold rated for the height with fall protection for your crew. Confirm the substrate type – masonry, EIFS, metal – and choose anchors accordingly; for example, select 2‑in masonry anchors for individual letters over 50 lb. You should also plan manpower and rigging: use a minimum two-person lift for letters heavier than 25 lb and pre-check wind-load requirements per local code.
Measuring and Marking
You should establish a level baseline and centerline using a laser level and chalk line, then apply full‑scale paper or MDF templates to confirm spacing and sightlines. Mark mounting hole centers to within ±1/8 in for precise alignment and locate studs or set anchors every 12-18 in along rails. When drilling, use pilot bits matched to anchor specs (e.g., 3/16 in pilot for 1/4 in anchors) and verify all holes against the template before fastening.
Electrical Requirements
You must confirm the sign’s electrical plan: most LED channel letters operate on 12V or 24V constant‑voltage drivers fed from a dedicated 120VAC circuit, so provide a dedicated breaker, an accessible disconnect, and compliance with NEC Article 600 and local amendments. Use outdoor‑rated transformers sized to total wattage, mount them in ventilated, lockable enclosures, and route conductors in conduit; choose wire gauge based on run length (use 14 AWG for short runs, 12 AWG for longer runs).
You’ll size the transformer by totaling each letter’s wattage and adding ~25% spare capacity-for example, 40 letters at 1.2 W each equals 48 W, so specify a 60-75 W driver. To control voltage drop, prefer 24V on runs over ~25 ft since current is halved; that lets you use smaller gauge wire at longer distances. Install inline fuses or per‑string current limiting where LED modules are grouped, use outdoor‑rated conductors (THHN or sign‑rated cable in conduit), and keep transformer access clear for servicing and inspection by the AHJ.
Installation Steps
Begin by transferring your layout to the wall with a full-size template, then drill anchor points and install raceways or standoffs. Mount letters starting from one end, seal edges with 100% silicone, route wiring into a weatherproof junction box, connect power supplies and test illumination, then perform level, gap and seal inspections. Typical install time for 10 letters is 3-5 hours.
Mounting the Letters
You use a full-size PVC or paper template to mark holes, drill pilot holes (3/16″ for metal studs, 3/8″ for masonry), and set anchors: 1/4″ wedge anchors for concrete or #14 Tek screws for metal. If letters are wider than 24″, add support every 12″ to prevent sag. Tighten fasteners to hand-plus quarter turn and apply a 3-5 mm silicone bead around backs for weatherproofing.
Connecting the Electrical Components
Start by calculating total LED current: sum each letter’s draw in amps, then size your 12V or 24V power supply with at least 20% headroom. For runs under 25 ft you can use 18 AWG, 25-50 ft use 16 AWG, and keep voltage drop below 3% (use thicker wire or 24V if exceeded). You should mount the PSU in a ventilated IP65 box and use DC-rated connectors and inline fuses.
For example, if each letter draws 1.2 A, ten letters total 12 A, so you should select a 12V 15 A (180 W) driver and fit a 15 A slow-blow fuse at the driver output. Route runs through conduit, label +/- rails, and you should use heat-shrink with adhesive and IP66-rated junctions for exterior installs. Test each letter under full dark conditions for hotspots and uniformity.
Post-Installation Checks
After mounting, perform a systematic walk-through: verify all fasteners are tight, seal penetrations with a 3/16-1/4″ silicone bead, label each circuit and photograph every letter for records. Allow 10-15 minutes per letter for inspection and documentation. Check raceway entries for water intrusion, confirm driver placement and ventilation clearances, and log serial numbers and measured voltages against the shop drawings to support warranty claims and future maintenance.
Functionality Test
Power each circuit and observe for 10-15 minutes to detect flicker or thermal drift. Measure driver output voltage and current and confirm they fall within ±5% of manufacturer specs; for 12-24V LED systems that often means checking 12.0-12.6V or 24.0-25.2V ranges. Test dimmers, photocells, timers, and emergency/backup lighting functions, and verify that color temperature and intensity are consistent across modules before leaving site.
Aesthetic Review
View the sign from typical sightlines-50, 100 and 200 ft for roadside installs-and inspect letter faces, returns and reveals for uniformity. Confirm color match under daylight and after dark; for example, replace modules if you see obvious color shifts between adjacent letters. Also check for visible seams, paint chips, or face bowing and take reference photos from the same vantage points used in design review.
For a deeper aesthetic check, use a lux meter or calibrated camera to quantify luminance at the intended viewing distances and compare to the design target (for instance, 300-700 cd/m² for storefronts). Measure reveal gaps and keep them under about 1/8″ (3 mm) where possible, correct misaligned returns, and perform touch-up painting or edge smoothing on-site to eliminate spec non-conformities before client handover.
Summing up
Summing up, you assess the site, secure permits, and take precise measurements; fabricate and wire each channel letter, test lighting and electrical connections, and mount letters with proper anchors and conduit. Seal penetrations, tidy wiring, and verify alignment and illumination. Finish with a thorough inspection and compliance checks so your signage performs reliably and meets safety and code requirements.
FAQ
Q: What are the initial steps before installing channel letters?
A: Conduct a site survey to record wall type, exact dimensions, mounting surface flatness, structural backing, nearby obstructions, and the location of electrical feeds. Verify local sign codes and obtain required permits. Review the approved sign drawings and engineering documents, confirm the mounting method (raceway, individual stud mount, or backer panel), and prepare a materials list including anchors, transformers, conduits, gaskets, and sealants. Create a layout template or CAD-derived jig to transfer the design to the wall at installation time.
Q: How do you set accurate layout lines and prepare the wall for mounting?
A: Clean the mounting surface and repair irregularities. Establish horizontal and vertical reference lines using a plumb line, level, or laser and locate the centerline of the sign. Position and secure the full-size paper or vinyl template; mark all hole locations and datum points on the wall. Where a backer or mounting rail is used, align and fasten it first using structural anchors appropriate for the substrate (masonry anchors, through-bolts, or toggle bolts for hollow walls). Drill pilot holes to the specified diameter and depth, install anchors, and verify the rail or mounting surface is perfectly level and plumb before proceeding.
Q: What are the common mounting methods for channel letters and how are the letters attached?
A: Common mounting methods are raceway-mounted (letters attached to an enclosed raceway that contains wiring and transformers), stud-through-wall (individual studs from letters pass through the wall and are secured with nuts inside), and flush-mount (letters mounted directly to a structural backer). For stud mounts, insert studs through predrilled holes, set backing washers and lock nuts to the specified torque, and use shims where required to maintain uniform face depth. For raceways, secure the raceway first, pull and label wiring, then bolt letters to the raceway using tamper-resistant fasteners. Use neoprene gaskets or closed-cell foam between metal surfaces to prevent vibration and water ingress.
Q: How should electrical wiring, transformers, and LED modules be installed and tested?
A: Run conduit from the building feed to the raceway or letter backbox and install a dedicated circuit per electrical code. Mount transformers in accessible, ventilated locations and size them for continuous LED load with a 20-25% buffer. Route low-voltage leads to each letter, secure connections with waterproof connectors or terminal blocks, and observe correct polarity for LED modules. Perform bench tests of each letter before wall mounting, then energize the system and verify uniform brightness, color temperature, and that there are no flickers or dead modules. Measure amp draw and voltage at the transformer to confirm load calculations, and install surge protection and a disconnect accessible per code.
Q: What finishing, sealing, and post-installation inspections are required to complete the job?
A: Install faces, trim, and diffusers, ensuring they fit flush without gaps. Apply UV-resistant silicone or approved gasketing at all seams, stud penetrations, and around raceway interfaces to prevent water intrusion. Touch up paint where necessary and install rain hoods or drip edges if specified. Perform a final inspection for level, alignment, bolt torque, electrical protection, and signage legibility at night. Document as-built wiring, transformer locations, and maintenance instructions for the client. Schedule periodic inspections for fastening integrity, LED performance, and waterproofing-replace failed modules and re-seal penetrations as needed.